<?xml version="1.0" encoding="utf-8"?>
<feed xmlns="http://www.w3.org/2005/Atom">
  <title>Jason</title>
  
  <link href="/atom.xml" rel="self"/>
  
  <link href="https://en.atjason.com/"/>
  <updated>2016-12-06T01:51:54.000Z</updated>
  <id>https://en.atjason.com/</id>
  
  <author>
    <name>Jason</name>
    
  </author>
  
  <generator uri="http://hexo.io/">Hexo</generator>
  
  <entry>
    <title>In-App Purchase Helper</title>
    <link href="https://en.atjason.com/Cocoa/IAPHelper.html"/>
    <id>https://en.atjason.com/Cocoa/IAPHelper.html</id>
    <published>2016-08-26T04:10:27.000Z</published>
    <updated>2016-12-06T01:51:54.000Z</updated>
    
    <content type="html"><![CDATA[<h1 id="What’s-IAPHelper"><a href="#What’s-IAPHelper" class="headerlink" title="What’s IAPHelper"></a>What’s IAPHelper</h1><p>IAPHelper simply wraps the API of Apple’s In-App Purchase using Swift. Very lightweight and easy to use.</p><p><a href="https://github.com/atjason/IAPHelper" target="_blank" rel="external">IAPHelper opens source and welcome to improve it.</a></p><h1 id="IAPHelper-Usage"><a href="#IAPHelper-Usage" class="headerlink" title="IAPHelper Usage"></a>IAPHelper Usage</h1><h2 id="Request-Product-List"><a href="#Request-Product-List" class="headerlink" title="Request Product List"></a>Request Product List</h2><figure class="highlight swift"><table><tr><td class="gutter"><pre><div class="line">1</div><div class="line">2</div><div class="line">3</div><div class="line">4</div><div class="line">5</div><div class="line">6</div><div class="line">7</div><div class="line">8</div><div class="line">9</div><div class="line">10</div><div class="line">11</div><div class="line">12</div><div class="line">13</div><div class="line">14</div><div class="line">15</div><div class="line">16</div><div class="line">17</div><div class="line">18</div></pre></td><td class="code"><pre><div class="line"><span class="keyword">var</span> productIdentifiers = <span class="type">Set</span>&lt;<span class="type">ProductIdentifier</span>&gt;()</div><div class="line">productIdentifiers.insert(<span class="string">"product_id_1"</span>)</div><div class="line">productIdentifiers.insert(<span class="string">"product_id_2"</span>)</div><div class="line"></div><div class="line"><span class="type">IAP</span>.requestProducts(productIdentifiers) &#123; (response, error) <span class="keyword">in</span></div><div class="line">	<span class="keyword">if</span> <span class="keyword">let</span> products = response?.products <span class="keyword">where</span> !products.isEmpty &#123;</div><div class="line">		<span class="comment">// Get the valid products</span></div><div class="line">	   </div><div class="line">	&#125; <span class="keyword">else</span> <span class="keyword">if</span> <span class="keyword">let</span> invalidProductIdentifiers = response?.invalidProductIdentifiers &#123;</div><div class="line">		<span class="comment">// Some products id are invalid</span></div><div class="line">	   </div><div class="line">	&#125; <span class="keyword">else</span> <span class="keyword">if</span> error?.code == <span class="type">SKErrorPaymentCancelled</span> &#123;</div><div class="line">		<span class="comment">// User cancelled</span></div><div class="line">	   </div><div class="line">	&#125; <span class="keyword">else</span> &#123;</div><div class="line">		<span class="comment">// Some error happened</span></div><div class="line">	&#125;</div><div class="line">&#125;</div></pre></td></tr></table></figure><a id="more"></a><h2 id="Purchase-Product"><a href="#Purchase-Product" class="headerlink" title="Purchase Product"></a>Purchase Product</h2><figure class="highlight swift"><table><tr><td class="gutter"><pre><div class="line">1</div><div class="line">2</div><div class="line">3</div><div class="line">4</div><div class="line">5</div><div class="line">6</div><div class="line">7</div><div class="line">8</div><div class="line">9</div><div class="line">10</div><div class="line">11</div></pre></td><td class="code"><pre><div class="line"> <span class="type">IAP</span>.purchaseProduct(productIdentifier, handler: &#123; (productIdentifier, error) <span class="keyword">in</span></div><div class="line">	<span class="keyword">if</span> <span class="keyword">let</span> identifier = productIdentifier &#123;</div><div class="line">		<span class="comment">// The product of 'productIdentifier' purchased.</span></div><div class="line">	     </div><div class="line">	&#125; <span class="keyword">else</span> <span class="keyword">if</span> error?.code == <span class="type">SKErrorPaymentCancelled</span> &#123;</div><div class="line">		<span class="comment">// User cancelled</span></div><div class="line">	     </div><div class="line">	&#125; <span class="keyword">else</span> &#123;</div><div class="line">		<span class="comment">// Some error happened</span></div><div class="line">	&#125;</div><div class="line">&#125;)</div></pre></td></tr></table></figure><h2 id="Restore"><a href="#Restore" class="headerlink" title="Restore"></a>Restore</h2><figure class="highlight swift"><table><tr><td class="gutter"><pre><div class="line">1</div><div class="line">2</div><div class="line">3</div><div class="line">4</div><div class="line">5</div><div class="line">6</div><div class="line">7</div><div class="line">8</div><div class="line">9</div><div class="line">10</div><div class="line">11</div><div class="line">12</div><div class="line">13</div><div class="line">14</div></pre></td><td class="code"><pre><div class="line"> <span class="type">IAP</span>.restorePurchases &#123; (productIdentifiers, error) <span class="keyword">in</span></div><div class="line">	 <span class="keyword">if</span> !productIdentifiers.isEmpty &#123;</div><div class="line">	 	<span class="comment">// Products restored</span></div><div class="line">	   </div><div class="line">	 &#125; <span class="keyword">else</span> <span class="keyword">if</span> error?.code == <span class="type">SKErrorUnknown</span> &#123;</div><div class="line">	 	<span class="comment">// <span class="doctag">NOTE:</span> if no product ever purchased, will return this error.</span></div><div class="line">	   </div><div class="line">	 &#125; <span class="keyword">else</span> <span class="keyword">if</span> error?.code == <span class="type">SKErrorPaymentCancelled</span> &#123;</div><div class="line">	 	<span class="comment">// User cancelled</span></div><div class="line">	   </div><div class="line">	 &#125; <span class="keyword">else</span> &#123;</div><div class="line">	 	<span class="comment">// Some error happened</span></div><div class="line">	 &#125;</div><div class="line">&#125;</div></pre></td></tr></table></figure><h2 id="Validate-Receipt"><a href="#Validate-Receipt" class="headerlink" title="Validate Receipt"></a>Validate Receipt</h2><figure class="highlight swift"><table><tr><td class="gutter"><pre><div class="line">1</div><div class="line">2</div><div class="line">3</div><div class="line">4</div><div class="line">5</div><div class="line">6</div><div class="line">7</div></pre></td><td class="code"><pre><div class="line"><span class="type">IAP</span>.validateReceipt(<span class="type">Constants</span>.<span class="type">IAPSharedSecret</span>) &#123; (statusCode, products) <span class="keyword">in</span></div><div class="line">	<span class="keyword">if</span> statusCode == <span class="type">ReceiptStatus</span>.<span class="type">NoRecipt</span>.rawValue &#123;</div><div class="line">		<span class="comment">// No Receipt in main bundle</span></div><div class="line">	&#125; <span class="keyword">else</span> &#123;</div><div class="line">		<span class="comment">// Get products with their expire date.</span></div><div class="line">	&#125;</div><div class="line">&#125;)</div></pre></td></tr></table></figure><p><strong>Note</strong>: IAPHelper directly validate with Apple’s server. It’s simple, but has risk. You decide use your own server or not as Apple suggested:</p><blockquote><p>Use a trusted server to communicate with the App Store. Using your own server lets you design your app to recognize and trust only your server, and lets you ensure that your server connects with the App Store server. It is not possible to build a trusted connection between a user’s device and the App Store directly because you don’t control either end of that connection.</p></blockquote><h2 id="Integrate-IAPHelper-in-Your-Project"><a href="#Integrate-IAPHelper-in-Your-Project" class="headerlink" title="Integrate IAPHelper in Your Project"></a>Integrate IAPHelper in Your Project</h2><p>Just copy <code>IAPHelper.swift</code> to your project, and use it as the demo shows.</p><h2 id="IAPHelper-Demo"><a href="#IAPHelper-Demo" class="headerlink" title="IAPHelper Demo"></a>IAPHelper Demo</h2><p><strong>NOTE</strong>: You need to change the app bundle id and product id to your own. And also set your shared secret in <code>Constants.swift</code>.</p><h1 id="Note"><a href="#Note" class="headerlink" title="Note"></a>Note</h1><p>This library can’t help you understand the basic concepts for IAP. For it, please refer to these documents.</p><ul><li><a href="https://developer.apple.com/library/ios/documentation/NetworkingInternet/Conceptual/StoreKitGuide/Introduction.html" target="_blank" rel="external">In-App Purchase Programming Guide</a></li><li><a href="https://developer.apple.com/library/ios/documentation/LanguagesUtilities/Conceptual/iTunesConnectInAppPurchase_Guide/Chapters/Introduction.html" target="_blank" rel="external">In-App Purchase Configuration Guide for iTunes Connect</a></li><li><a href="https://developer.apple.com/library/ios/technotes/tn2387/_index.html" target="_blank" rel="external">In-App Purchase Best Practices</a></li><li><a href="https://developer.apple.com/library/ios/releasenotes/General/ValidateAppStoreReceipt/Introduction.html" target="_blank" rel="external">Receipt Validation Programming Guide</a></li><li><a href="https://developer.apple.com/library/ios/technotes/tn2259/_index.html" target="_blank" rel="external">Adding In-App Purchase to your iOS and macOS Applications</a></li></ul><h2 id="What’s-Test"><a href="#What’s-Test" class="headerlink" title="What’s Test"></a>What’s Test</h2><p>It’s mainly test on macOS 10.10 with auto-renew subscription. Now it’s used by my app of <a href="http://toolinbox.net/en/iPic/" target="_blank" rel="external">iPic</a>.</p>]]></content>
    
    <summary type="html">
    
      &lt;h1 id=&quot;What’s-IAPHelper&quot;&gt;&lt;a href=&quot;#What’s-IAPHelper&quot; class=&quot;headerlink&quot; title=&quot;What’s IAPHelper&quot;&gt;&lt;/a&gt;What’s IAPHelper&lt;/h1&gt;&lt;p&gt;IAPHelper simply wraps the API of Apple’s In-App Purchase using Swift. Very lightweight and easy to use.&lt;/p&gt;&lt;p&gt;&lt;a href=&quot;https://github.com/atjason/IAPHelper&quot;&gt;IAPHelper opens source and welcome to improve it.&lt;/a&gt;&lt;/p&gt;&lt;h1 id=&quot;IAPHelper-Usage&quot;&gt;&lt;a href=&quot;#IAPHelper-Usage&quot; class=&quot;headerlink&quot; title=&quot;IAPHelper Usage&quot;&gt;&lt;/a&gt;IAPHelper Usage&lt;/h1&gt;&lt;h2 id=&quot;Request-Product-List&quot;&gt;&lt;a href=&quot;#Request-Product-List&quot; class=&quot;headerlink&quot; title=&quot;Request Product List&quot;&gt;&lt;/a&gt;Request Product List&lt;/h2&gt;&lt;figure class=&quot;highlight swift&quot;&gt;&lt;table&gt;&lt;tr&gt;&lt;td class=&quot;gutter&quot;&gt;&lt;pre&gt;&lt;div class=&quot;line&quot;&gt;1&lt;/div&gt;&lt;div class=&quot;line&quot;&gt;2&lt;/div&gt;&lt;div class=&quot;line&quot;&gt;3&lt;/div&gt;&lt;div class=&quot;line&quot;&gt;4&lt;/div&gt;&lt;div class=&quot;line&quot;&gt;5&lt;/div&gt;&lt;div class=&quot;line&quot;&gt;6&lt;/div&gt;&lt;div class=&quot;line&quot;&gt;7&lt;/div&gt;&lt;div class=&quot;line&quot;&gt;8&lt;/div&gt;&lt;div class=&quot;line&quot;&gt;9&lt;/div&gt;&lt;div class=&quot;line&quot;&gt;10&lt;/div&gt;&lt;div class=&quot;line&quot;&gt;11&lt;/div&gt;&lt;div class=&quot;line&quot;&gt;12&lt;/div&gt;&lt;div class=&quot;line&quot;&gt;13&lt;/div&gt;&lt;div class=&quot;line&quot;&gt;14&lt;/div&gt;&lt;div class=&quot;line&quot;&gt;15&lt;/div&gt;&lt;div class=&quot;line&quot;&gt;16&lt;/div&gt;&lt;div class=&quot;line&quot;&gt;17&lt;/div&gt;&lt;div class=&quot;line&quot;&gt;18&lt;/div&gt;&lt;/pre&gt;&lt;/td&gt;&lt;td class=&quot;code&quot;&gt;&lt;pre&gt;&lt;div class=&quot;line&quot;&gt;&lt;span class=&quot;keyword&quot;&gt;var&lt;/span&gt; productIdentifiers = &lt;span class=&quot;type&quot;&gt;Set&lt;/span&gt;&amp;lt;&lt;span class=&quot;type&quot;&gt;ProductIdentifier&lt;/span&gt;&amp;gt;()&lt;/div&gt;&lt;div class=&quot;line&quot;&gt;productIdentifiers.insert(&lt;span class=&quot;string&quot;&gt;&quot;product_id_1&quot;&lt;/span&gt;)&lt;/div&gt;&lt;div class=&quot;line&quot;&gt;productIdentifiers.insert(&lt;span class=&quot;string&quot;&gt;&quot;product_id_2&quot;&lt;/span&gt;)&lt;/div&gt;&lt;div class=&quot;line&quot;&gt;&lt;/div&gt;&lt;div class=&quot;line&quot;&gt;&lt;span class=&quot;type&quot;&gt;IAP&lt;/span&gt;.requestProducts(productIdentifiers) &amp;#123; (response, error) &lt;span class=&quot;keyword&quot;&gt;in&lt;/span&gt;&lt;/div&gt;&lt;div class=&quot;line&quot;&gt;	&lt;span class=&quot;keyword&quot;&gt;if&lt;/span&gt; &lt;span class=&quot;keyword&quot;&gt;let&lt;/span&gt; products = response?.products &lt;span class=&quot;keyword&quot;&gt;where&lt;/span&gt; !products.isEmpty &amp;#123;&lt;/div&gt;&lt;div class=&quot;line&quot;&gt;		&lt;span class=&quot;comment&quot;&gt;// Get the valid products&lt;/span&gt;&lt;/div&gt;&lt;div class=&quot;line&quot;&gt;	   &lt;/div&gt;&lt;div class=&quot;line&quot;&gt;	&amp;#125; &lt;span class=&quot;keyword&quot;&gt;else&lt;/span&gt; &lt;span class=&quot;keyword&quot;&gt;if&lt;/span&gt; &lt;span class=&quot;keyword&quot;&gt;let&lt;/span&gt; invalidProductIdentifiers = response?.invalidProductIdentifiers &amp;#123;&lt;/div&gt;&lt;div class=&quot;line&quot;&gt;		&lt;span class=&quot;comment&quot;&gt;// Some products id are invalid&lt;/span&gt;&lt;/div&gt;&lt;div class=&quot;line&quot;&gt;	   &lt;/div&gt;&lt;div class=&quot;line&quot;&gt;	&amp;#125; &lt;span class=&quot;keyword&quot;&gt;else&lt;/span&gt; &lt;span class=&quot;keyword&quot;&gt;if&lt;/span&gt; error?.code == &lt;span class=&quot;type&quot;&gt;SKErrorPaymentCancelled&lt;/span&gt; &amp;#123;&lt;/div&gt;&lt;div class=&quot;line&quot;&gt;		&lt;span class=&quot;comment&quot;&gt;// User cancelled&lt;/span&gt;&lt;/div&gt;&lt;div class=&quot;line&quot;&gt;	   &lt;/div&gt;&lt;div class=&quot;line&quot;&gt;	&amp;#125; &lt;span class=&quot;keyword&quot;&gt;else&lt;/span&gt; &amp;#123;&lt;/div&gt;&lt;div class=&quot;line&quot;&gt;		&lt;span class=&quot;comment&quot;&gt;// Some error happened&lt;/span&gt;&lt;/div&gt;&lt;div class=&quot;line&quot;&gt;	&amp;#125;&lt;/div&gt;&lt;div class=&quot;line&quot;&gt;&amp;#125;&lt;/div&gt;&lt;/pre&gt;&lt;/td&gt;&lt;/tr&gt;&lt;/table&gt;&lt;/figure&gt;
    
    </summary>
    
      <category term="Cocoa" scheme="https://en.atjason.com/categories/Cocoa/"/>
    
    
  </entry>
  
  <entry>
    <title>iptables</title>
    <link href="https://en.atjason.com/IT/iptables.html"/>
    <id>https://en.atjason.com/IT/iptables.html</id>
    <published>2016-07-16T03:49:56.000Z</published>
    <updated>2016-12-06T01:51:54.000Z</updated>
    
    <content type="html"><![CDATA[<h1 id="How-iptables-Works"><a href="#How-iptables-Works" class="headerlink" title="How iptables Works"></a>How iptables Works</h1><p><code>iptables</code> works by matching each packet that crosses the networking interface against a set of <code>rules</code> (grouped by <code>chains</code>) to decide what to do (called <code>target</code>).</p><h2 id="rules"><a href="#rules" class="headerlink" title="rules"></a>rules</h2><p>The iptables firewall operates by comparing network traffic against a set of <code>rules</code>. The rules define the characteristics that a packet must have to match the rule, and the action that should be taken for matching packets.</p><h2 id="chains"><a href="#chains" class="headerlink" title="chains"></a>chains</h2><p>These rules are organized into groups called <code>chains</code>. A chain is a set of rules that a packet is checked against sequentially. When the packet matches one of the rules, it executes the associated action and is not checked against the remaining rules in the chain.<br>A user can create chains as needed. There are three chains defined by default. They are:<br>· <strong>INPUT</strong>: This chain handles all packets that are addressed to your server.<br>· <strong>OUTPUT</strong>: This chain contains rules for traffic created by your server.<br>· <strong>FORWARD</strong>: This chain is used to deal with traffic destined for other servers that are not created on your server.<br><a id="more"></a></p><h3 id="policy"><a href="#policy" class="headerlink" title="policy"></a>policy</h3><p>Each chain can contain zero or more rules, and has a default <code>policy</code>. The policy determines what happens when a packet does not match any rule. So policy could also be treated as the last rule in chain.</p><h2 id="target"><a href="#target" class="headerlink" title="target"></a>target</h2><p>When the defined pattern matches, the action that takes place is called a <code>target</code>.</p><ul><li>A target can be a final policy decision for the packet, such as accept, or drop.</li><li>It can also be move the packet to a different chain for processing, or simply log the encounter.</li><li>There are many options.</li></ul><h2 id="IPv4-Versus-IPv6"><a href="#IPv4-Versus-IPv6" class="headerlink" title="IPv4 Versus IPv6"></a>IPv4 Versus IPv6</h2><p>The netfilter firewall that is included in the Linux kernel keeps IPv4 and IPv6 traffic completely separate. For IPv6 traffic, a companion command called <code>ip6tables</code> is used.</p><h2 id="Things-to-Keep-in-Mind"><a href="#Things-to-Keep-in-Mind" class="headerlink" title="Things to Keep in Mind"></a>Things to Keep in Mind</h2><ul><li>First, we need to make sure that we have rules to keep current connections active if we implement a default drop policy. This is especially important if you are connected to your server through SSH.</li><li>Another thing to keep in mind is that the order of the rules in each chain matter.<ul><li>Rules near the top of a chain should have a higher level of specificity than rules at the bottom.</li><li>You should match specific cases first, and then provide more general rules to match broader patterns.</li><li>If a packet falls through the entire chain (doesn’t match any rules), it will hit the most general rule, the default policy.</li><li>For this reason, a chain’s default policy very strongly dictates the types of rules that will be included in the chain. A chain with the default policy of ACCEPT will contain rules that explicitly drop packets. A chain that defaults to DROP will contain exceptions for packets that should be specifically accepted.</li></ul></li></ul><h1 id="List-Rules"><a href="#List-Rules" class="headerlink" title="List Rules"></a>List Rules</h1><figure class="highlight plain"><table><tr><td class="gutter"><pre><div class="line">1</div></pre></td><td class="code"><pre><div class="line">sudo iptables -S</div></pre></td></tr></table></figure><p>Demo output:</p><figure class="highlight plain"><table><tr><td class="gutter"><pre><div class="line">1</div><div class="line">2</div><div class="line">3</div><div class="line">4</div><div class="line">5</div><div class="line">6</div><div class="line">7</div><div class="line">8</div><div class="line">9</div><div class="line">10</div><div class="line">11</div><div class="line">12</div><div class="line">13</div><div class="line">14</div><div class="line">15</div><div class="line">16</div></pre></td><td class="code"><pre><div class="line">-P INPUT DROP</div><div class="line">-P FORWARD DROP</div><div class="line">-P OUTPUT ACCEPT</div><div class="line">-N ICMP</div><div class="line">-N TCP</div><div class="line">-N UDP</div><div class="line">-A INPUT -m conntrack --ctstate RELATED,ESTABLISHED -j ACCEPT</div><div class="line">-A INPUT -i lo -j ACCEPT</div><div class="line">-A INPUT -m conntrack --ctstate INVALID -j DROP</div><div class="line">-A INPUT -p udp -m conntrack --ctstate NEW -j UDP</div><div class="line">-A INPUT -p tcp -m tcp --tcp-flags FIN,SYN,RST,ACK SYN -m conntrack --ctstate NEW -j TCP</div><div class="line">-A INPUT -p icmp -m conntrack --ctstate NEW -j ICMP</div><div class="line">-A INPUT -p udp -j REJECT --reject-with icmp-port-unreachable</div><div class="line">-A INPUT -p tcp -j REJECT --reject-with tcp-reset</div><div class="line">-A INPUT -j REJECT --reject-with icmp-proto-unreachable</div><div class="line">-A TCP -p tcp -m tcp --dport 22 -j ACCEPT</div></pre></td></tr></table></figure><h2 id="List-Specific-Chain"><a href="#List-Specific-Chain" class="headerlink" title="List Specific Chain"></a>List Specific Chain</h2><p>Specify the chain name directly after the -S option.</p><figure class="highlight plain"><table><tr><td class="gutter"><pre><div class="line">1</div></pre></td><td class="code"><pre><div class="line">sudo iptables -S INPUT</div></pre></td></tr></table></figure><p>Demo output:</p><figure class="highlight plain"><table><tr><td class="gutter"><pre><div class="line">1</div><div class="line">2</div><div class="line">3</div><div class="line">4</div><div class="line">5</div><div class="line">6</div><div class="line">7</div></pre></td><td class="code"><pre><div class="line">-P INPUT ACCEPT</div><div class="line">-A INPUT -s 39.187.179.166/32 -j DROP</div><div class="line">-A INPUT -i lo -j ACCEPT</div><div class="line">-A INPUT -m state --state RELATED,ESTABLISHED -j ACCEPT</div><div class="line">-A INPUT -p tcp -m tcp --dport 22 -j ACCEPT</div><div class="line">-A INPUT -p tcp -m tcp --dport 80 -j ACCEPT</div><div class="line">-A INPUT -p icmp -m icmp --icmp-type 8 -j ACCEPT</div></pre></td></tr></table></figure><p>##List Rules as Tables<br>Listing the iptables rules in the table view can be useful for comparing different rules against each other.</p><figure class="highlight plain"><table><tr><td class="gutter"><pre><div class="line">1</div></pre></td><td class="code"><pre><div class="line">sudo iptables -L</div></pre></td></tr></table></figure><p>This will output all of current rules sorted by chain.</p><figure class="highlight plain"><table><tr><td class="gutter"><pre><div class="line">1</div></pre></td><td class="code"><pre><div class="line">sudo iptables -L INPUT --line-numbers</div></pre></td></tr></table></figure><p>Demo output:</p><figure class="highlight plain"><table><tr><td class="gutter"><pre><div class="line">1</div><div class="line">2</div><div class="line">3</div><div class="line">4</div><div class="line">5</div><div class="line">6</div><div class="line">7</div><div class="line">8</div><div class="line">9</div><div class="line">10</div><div class="line">11</div><div class="line">12</div><div class="line">13</div><div class="line">14</div><div class="line">15</div><div class="line">16</div></pre></td><td class="code"><pre><div class="line">Chain INPUT (policy ACCEPT)</div><div class="line">num  target     prot opt source               destination         </div><div class="line">1    f2b-shadowsocks  tcp  --  anywhere             anywhere             multiport dports 6000:6100</div><div class="line">2    f2b-mysqld-auth  tcp  --  anywhere             anywhere             multiport dports mysql</div><div class="line">3    f2b-php-url-fopen  tcp  --  anywhere             anywhere             multiport dports http,https</div><div class="line">4    f2b-nginx-botsearch  tcp  --  anywhere             anywhere             multiport dports http,https</div><div class="line">5    f2b-nginx-http-auth  tcp  --  anywhere             anywhere             multiport dports http,https</div><div class="line">6    f2b-sshd-ddos  tcp  --  anywhere             anywhere             multiport dports 7022</div><div class="line">7    f2b-sshd   tcp  --  anywhere             anywhere             multiport dports 7022</div><div class="line">8    DROP       all  --  39.187.179.166       anywhere            </div><div class="line">9    ACCEPT     all  --  anywhere             anywhere            </div><div class="line">10   ACCEPT     all  --  anywhere             anywhere             state RELATED,ESTABLISHED</div><div class="line">11   ACCEPT     tcp  --  anywhere             anywhere             tcp dpt:ssh</div><div class="line">12   ACCEPT     tcp  --  anywhere             anywhere             tcp dpt:http</div><div class="line">13   DROP       tcp  --  anywhere             anywhere             tcp dpt:mysql</div><div class="line">14   ACCEPT     icmp --  anywhere             anywhere             icmp echo-request</div></pre></td></tr></table></figure><p>The first line of output indicates the chain name (INPUT, in this case), followed by its default policy (DROP). The next line consists of the headers of each column in the table, and is followed by the chain’s rules.</p><ul><li><code>target</code>: If a packet matches the rule, the target specifies what should be done with it. For example, a packet can be accepted, dropped, logged, or sent to another chain to be compared against more rules</li><li><code>prot</code>: The protocol, such as tcp, udp, icmp, or all</li><li><code>opt</code>: Rarely used, this column indicates IP options</li><li><code>source</code>: The source IP address or subnet of the traffic, or anywhere</li><li><code>destination</code>: The destination IP address or subnet of the traffic, or anywhere</li></ul><p>The last column, which is not labeled, indicates the options of a rule.</p><h1 id="Add-Rules"><a href="#Add-Rules" class="headerlink" title="Add Rules"></a>Add Rules</h1><p>Accept connection on port 22 for ssh:</p><figure class="highlight plain"><table><tr><td class="gutter"><pre><div class="line">1</div></pre></td><td class="code"><pre><div class="line">sudo iptables -A INPUT -p tcp --dport 22 -j ACCEPT</div></pre></td></tr></table></figure><ul><li><code>-A INPUT</code>: The -A flag <strong>appends</strong> a rule to the end of a chain (here the chain is INPUT). In another side <code>-I INPUT 2</code> means insert to the 2nd rule of INPUT chain.</li><li><code>-p tcp</code>: This option matches packets if the protocol being used is TCP.</li><li><code>--dport</code>: This option is available if the -p tcp flag is given. It gives a further requirement of matching the destination port for the matching packet.</li><li><code>-j ACCEPT</code>: This specifies the target of matching packets.</li></ul><h1 id="Delete-Rules"><a href="#Delete-Rules" class="headerlink" title="Delete Rules"></a>Delete Rules</h1><h2 id="Delete-Rule-by-Specification"><a href="#Delete-Rule-by-Specification" class="headerlink" title="Delete Rule by Specification"></a>Delete Rule by Specification</h2><p>For example, if you want to delete the rule that drops invalid incoming packets (-A INPUT -m conntrack –ctstate INVALID -j DROP), you could run this command:</p><figure class="highlight plain"><table><tr><td class="gutter"><pre><div class="line">1</div></pre></td><td class="code"><pre><div class="line">sudo iptables -D INPUT -m conntrack --ctstate INVALID -j DROP</div></pre></td></tr></table></figure><p>Note that the -A option, which is used to indicate the rule position at creation time, should be excluded here.</p><h2 id="Delete-Rule-by-Chain-and-Number"><a href="#Delete-Rule-by-Chain-and-Number" class="headerlink" title="Delete Rule by Chain and Number"></a>Delete Rule by Chain and Number</h2><p>To determine a rule’s line number, list the rules in the table format and add the –line-numbers option:</p><figure class="highlight plain"><table><tr><td class="gutter"><pre><div class="line">1</div></pre></td><td class="code"><pre><div class="line">sudo iptables -L --line-numbers</div></pre></td></tr></table></figure><p>Then run theiptables -D command followed by the chain and rule number.</p><figure class="highlight plain"><table><tr><td class="gutter"><pre><div class="line">1</div></pre></td><td class="code"><pre><div class="line">sudo iptables -D INPUT 3</div></pre></td></tr></table></figure><h1 id="Drop-Rules"><a href="#Drop-Rules" class="headerlink" title="Drop Rules"></a>Drop Rules</h1><p>There’re 2 ways for drop:</p><ul><li>Set the default policy for chain as <code>ACCEPT</code>. Then if a connection doesn’t march any rules in the chain, it will be accepted.<ul><li>If using this way, need to set drop rule one by one. If missed on, it will be security hole.</li></ul></li><li>Set the default policy for chain as <code>DROP</code>. Then if a connection doesn’t march any rules in the chain, it will be dropped.<ul><li>If using this way, only need to set accept rules. All others will be dropped by default. It’s strict but safe.</li></ul></li></ul><p>Set policy of chain to <code>ACCEPT</code> or <code>DROP</code>:</p><figure class="highlight plain"><table><tr><td class="gutter"><pre><div class="line">1</div><div class="line">2</div></pre></td><td class="code"><pre><div class="line">sudo iptables -P INPUT ACCEPT</div><div class="line">sudo iptables -P INPUT DROP</div></pre></td></tr></table></figure><p>Add a <code>DROP</code> rule in <code>INPUT</code> chain:</p><figure class="highlight plain"><table><tr><td class="gutter"><pre><div class="line">1</div></pre></td><td class="code"><pre><div class="line">sudo iptables -A INPUT -j DROP</div></pre></td></tr></table></figure><h1 id="Block-an-IP-Address"><a href="#Block-an-IP-Address" class="headerlink" title="Block an IP Address"></a>Block an IP Address</h1><p>To block network connections that originate from a specific IP address, 15.15.15.51 for example, run this command:</p><figure class="highlight plain"><table><tr><td class="gutter"><pre><div class="line">1</div></pre></td><td class="code"><pre><div class="line">sudo iptables -A INPUT -s 15.15.15.51 -j DROP</div></pre></td></tr></table></figure><p>If you want to reject the connection instead, which will respond to the connection request with a “connection refused” error, replace “DROP” with “REJECT” like this:</p><figure class="highlight plain"><table><tr><td class="gutter"><pre><div class="line">1</div></pre></td><td class="code"><pre><div class="line">sudo iptables -A INPUT -s 15.15.15.51 -j REJECT</div></pre></td></tr></table></figure><h1 id="Show-Packet-Counts-and-Aggregate-Size"><a href="#Show-Packet-Counts-and-Aggregate-Size" class="headerlink" title="Show Packet Counts and Aggregate Size"></a>Show Packet Counts and Aggregate Size</h1><p>This is often useful when trying to get a rough idea of which rules are matching against packets. For example, let’s look at the INPUT chain again, with the -v option:</p><figure class="highlight plain"><table><tr><td class="gutter"><pre><div class="line">1</div></pre></td><td class="code"><pre><div class="line">sudo iptables -L INPUT -v</div></pre></td></tr></table></figure><p>Example: Verbose Listing</p><figure class="highlight plain"><table><tr><td class="gutter"><pre><div class="line">1</div><div class="line">2</div><div class="line">3</div><div class="line">4</div><div class="line">5</div><div class="line">6</div><div class="line">7</div><div class="line">8</div><div class="line">9</div><div class="line">10</div><div class="line">11</div></pre></td><td class="code"><pre><div class="line">Chain INPUT (policy DROP 0 packets, 0 bytes)</div><div class="line"> pkts bytes target     prot opt in     out     source               destination</div><div class="line"> 284K   42M ACCEPT     all  --  any    any     anywhere             anywhere             ctstate RELATED,ESTABLISHED</div><div class="line">    0     0 ACCEPT     all  --  lo     any     anywhere             anywhere</div><div class="line">    0     0 DROP       all  --  any    any     anywhere             anywhere             ctstate INVALID</div><div class="line">  396 63275 UDP        udp  --  any    any     anywhere             anywhere             ctstate NEW</div><div class="line">17067 1005K TCP        tcp  --  any    any     anywhere             anywhere             tcp flags:FIN,SYN,RST,ACK/SYN ctstate NEW</div><div class="line"> 2410  154K ICMP       icmp --  any    any     anywhere             anywhere             ctstate NEW</div><div class="line">  396 63275 REJECT     udp  --  any    any     anywhere             anywhere             reject-with icmp-port-unreachable</div><div class="line"> 2916  179K REJECT     all  --  any    any     anywhere             anywhere             reject-with icmp-proto-unreachable</div><div class="line">    0     0 ACCEPT     tcp  --  any    any     anywhere             anywhere             tcp dpt:ssh ctstate NEW,ESTABLISHED</div></pre></td></tr></table></figure><h2 id="Reset-Packet-Counts-and-Aggregate-Size"><a href="#Reset-Packet-Counts-and-Aggregate-Size" class="headerlink" title="Reset Packet Counts and Aggregate Size"></a>Reset Packet Counts and Aggregate Size</h2><p>They also reset if a reboot occurs. This is useful if you want to see if your server is receiving new traffic that matches your existing rules.</p><p>To clear the counters for all chains and rules, use the -Z option by itself:</p><figure class="highlight plain"><table><tr><td class="gutter"><pre><div class="line">1</div><div class="line">2</div><div class="line">3</div></pre></td><td class="code"><pre><div class="line">sudo iptables -Z</div><div class="line">sudo iptables -Z INPUT</div><div class="line">sudo iptables -Z INPUT 1</div></pre></td></tr></table></figure><h1 id="Save-iptables-Configuration"><a href="#Save-iptables-Configuration" class="headerlink" title="Save iptables Configuration"></a>Save iptables Configuration</h1><p>By default, the rules that you add to iptables are ephemeral. This means that when you restart your server, your iptables rules will be gone. The easiest way to save is with the iptables-persistent package.</p><figure class="highlight plain"><table><tr><td class="gutter"><pre><div class="line">1</div><div class="line">2</div></pre></td><td class="code"><pre><div class="line">sudo apt-get update</div><div class="line">sudo apt-get install iptables-persistent</div></pre></td></tr></table></figure><p>Once the installation is complete, you will have a new service called <code>iptables-persistent</code> that is configured to run at boot. This service will load in your rules and apply them when the server is started.</p><p>If you ever update your firewall and want to preserve the changes, you must save your iptables rules for them to be persistent.</p><figure class="highlight plain"><table><tr><td class="gutter"><pre><div class="line">1</div></pre></td><td class="code"><pre><div class="line">sudo service netfilter-persistent save</div></pre></td></tr></table></figure><p>This will overwrite your /etc/iptables/rules.v4 and /etc/iptables/rules.v6 files with the policies you crafted on the command line.</p><figure class="highlight plain"><table><tr><td class="gutter"><pre><div class="line">1</div><div class="line">2</div><div class="line">3</div></pre></td><td class="code"><pre><div class="line">/etc/iptables.rules </div><div class="line">/etc/iptables/rules.v4</div><div class="line">/etc/iptables/rules.v6</div></pre></td></tr></table></figure><h1 id="Create-Your-Own-Firewall-by-iptables"><a href="#Create-Your-Own-Firewall-by-iptables" class="headerlink" title="Create Your Own Firewall by iptables"></a>Create Your Own Firewall by iptables</h1><p>Pre-condititions:</p><ul><li>Backup existing iptables. Could just copy output of <code>sudo iptables -S</code>, or copy rules saved by <code>iptables-persistent</code> as mentioned above.</li><li>If you lock yourself from accessing using ssh, make sure you have other ways to access it.</li></ul><h2 id="Create-Protocol-Specific-Chains"><a href="#Create-Protocol-Specific-Chains" class="headerlink" title="Create Protocol-Specific Chains"></a>Create Protocol-Specific Chains</h2><figure class="highlight plain"><table><tr><td class="gutter"><pre><div class="line">1</div><div class="line">2</div><div class="line">3</div></pre></td><td class="code"><pre><div class="line">sudo iptables -N UDP</div><div class="line">sudo iptables -N TCP</div><div class="line">sudo iptables -N ICMP</div></pre></td></tr></table></figure><p>Enable ssh, http, https:</p><figure class="highlight plain"><table><tr><td class="gutter"><pre><div class="line">1</div><div class="line">2</div></pre></td><td class="code"><pre><div class="line">sudo iptables -A TCP -p tcp --dport 22 -j ACCEPT</div><div class="line">sudo iptables -A TCP -p tcp --dport 80,443 -j ACCEPT</div></pre></td></tr></table></figure><p>Enable other custom service:</p><figure class="highlight plain"><table><tr><td class="gutter"><pre><div class="line">1</div><div class="line">2</div></pre></td><td class="code"><pre><div class="line">sudo iptables -A TCP -p tcp --dport 8000:8010 -j ACCEPT</div><div class="line">sudo iptables -A UDP -p udp --dport 8000:8010 -j ACCEPT</div></pre></td></tr></table></figure><h2 id="Create-General-Purpose-Accept-and-Deny-Rules"><a href="#Create-General-Purpose-Accept-and-Deny-Rules" class="headerlink" title="Create General Purpose Accept and Deny Rules"></a>Create General Purpose Accept and Deny Rules</h2><p>First, we will create an exception to accept all traffic that is part of an established connection or is related to an established connection:</p><figure class="highlight plain"><table><tr><td class="gutter"><pre><div class="line">1</div></pre></td><td class="code"><pre><div class="line">sudo iptables -A INPUT -m conntrack --ctstate ESTABLISHED,RELATED -j ACCEPT</div></pre></td></tr></table></figure><p>Allow all traffic originating on the local loopback interface.</p><figure class="highlight plain"><table><tr><td class="gutter"><pre><div class="line">1</div></pre></td><td class="code"><pre><div class="line">sudo iptables -A INPUT -i lo -j ACCEPT</div></pre></td></tr></table></figure><p>Finally, we want to deny all invalid packets.</p><figure class="highlight plain"><table><tr><td class="gutter"><pre><div class="line">1</div></pre></td><td class="code"><pre><div class="line">sudo iptables -A INPUT -m conntrack --ctstate INVALID -j DROP</div></pre></td></tr></table></figure><h2 id="Creating-the-Jump-Rules-to-the-Protocol-Specific-Chains"><a href="#Creating-the-Jump-Rules-to-the-Protocol-Specific-Chains" class="headerlink" title="Creating the Jump Rules to the Protocol-Specific Chains"></a>Creating the Jump Rules to the Protocol-Specific Chains</h2><p>Direct traffic in the INPUT chain into the appropriate protocol-specific chains.</p><figure class="highlight plain"><table><tr><td class="gutter"><pre><div class="line">1</div><div class="line">2</div><div class="line">3</div></pre></td><td class="code"><pre><div class="line">sudo iptables -A INPUT -p udp -m conntrack --ctstate NEW -j UDP</div><div class="line">sudo iptables -A INPUT -p tcp --syn -m conntrack --ctstate NEW -j TCP</div><div class="line">sudo iptables -A INPUT -p icmp -m conntrack --ctstate NEW -j ICMP</div></pre></td></tr></table></figure><h2 id="Reject-All-Remaining-Traffic"><a href="#Reject-All-Remaining-Traffic" class="headerlink" title="Reject All Remaining Traffic"></a>Reject All Remaining Traffic</h2><p>If a packet that was passed to a protocol-specific chain did not match any of the rules within, control will be passed back to the INPUT chain. Anything that reaches this point should not be allowed by our firewall. We will deny the traffic using the REJECT target, which sends a response message to the client.</p><p>Attempting to reach a closed UDP port will result in an ICMP “port unreachable” message.</p><figure class="highlight plain"><table><tr><td class="gutter"><pre><div class="line">1</div></pre></td><td class="code"><pre><div class="line">sudo iptables -A INPUT -p udp -j REJECT --reject-with icmp-port-unreachable</div></pre></td></tr></table></figure><p>Attempting to establish a TCP connection on a closed port results in a TCP RST response:</p><figure class="highlight plain"><table><tr><td class="gutter"><pre><div class="line">1</div></pre></td><td class="code"><pre><div class="line">sudo iptables -A INPUT -p tcp -j REJECT --reject-with tcp-reset</div></pre></td></tr></table></figure><p>For all other packets, we can send an ICMP “protocol unreachable” message to indicate that the server doesn’t respond to packets of that type:</p><figure class="highlight plain"><table><tr><td class="gutter"><pre><div class="line">1</div></pre></td><td class="code"><pre><div class="line">sudo iptables -A INPUT -j REJECT --reject-with icmp-proto-unreachable</div></pre></td></tr></table></figure><h2 id="Adjusting-Default-Policies"><a href="#Adjusting-Default-Policies" class="headerlink" title="Adjusting Default Policies"></a>Adjusting Default Policies</h2><p>Set the default policy to DROP as a precaution.</p><figure class="highlight plain"><table><tr><td class="gutter"><pre><div class="line">1</div><div class="line">2</div><div class="line">3</div></pre></td><td class="code"><pre><div class="line">sudo iptables -P INPUT DROP</div><div class="line">sudo iptables -P FORWARD DROP</div><div class="line">sudo iptables -P OUTPUT ACCEPT</div></pre></td></tr></table></figure><h2 id="Saving-iptables-Rules"><a href="#Saving-iptables-Rules" class="headerlink" title="Saving iptables Rules"></a>Saving iptables Rules</h2><figure class="highlight plain"><table><tr><td class="gutter"><pre><div class="line">1</div><div class="line">2</div><div class="line">3</div></pre></td><td class="code"><pre><div class="line">sudo service netfilter-persistent save</div><div class="line">or </div><div class="line">sudo /etc/init.d/iptables-persistent save</div></pre></td></tr></table></figure><p>This will overwrite your /etc/iptables/rules.v4 and /etc/iptables/rules.v6 files with the policies you crafted on the command line.</p><h1 id="Test-your-Firewall-Configuration-with-Nmap-and-Tcpdump"><a href="#Test-your-Firewall-Configuration-with-Nmap-and-Tcpdump" class="headerlink" title="Test your Firewall Configuration with Nmap and Tcpdump"></a>Test your Firewall Configuration with Nmap and Tcpdump</h1><p><a href="https://www.digitalocean.com/community/tutorials/how-to-test-your-firewall-configuration-with-nmap-and-tcpdump" target="_blank" rel="external">https://www.digitalocean.com/community/tutorials/how-to-test-your-firewall-configuration-with-nmap-and-tcpdump</a></p><p>Preconditions:</p><ul><li>Install tcpdump build-essential libssl-dev, nmap</li></ul><h2 id="Scan-your-Target-for-Open-TCP-Ports"><a href="#Scan-your-Target-for-Open-TCP-Ports" class="headerlink" title="Scan your Target for Open TCP Ports"></a>Scan your Target for Open TCP Ports</h2><p>Setting Up the Packet Capture</p><figure class="highlight plain"><table><tr><td class="gutter"><pre><div class="line">1</div></pre></td><td class="code"><pre><div class="line">sudo tcpdump host target_ip_addr -w ~/scan_results/syn_scan/packets</div></pre></td></tr></table></figure><p>With <code>tcpdump</code> recording our traffic to the target machine, we are ready to run the SYN scan using <code>nmap</code>.</p><figure class="highlight plain"><table><tr><td class="gutter"><pre><div class="line">1</div></pre></td><td class="code"><pre><div class="line">sudo nmap -sS -Pn -p- -T4 -vv --reason -oN ~/scan_results/syn_scan/nmap.results target_ip_addr</div></pre></td></tr></table></figure><p>The results are saved in ~/scan_results/syn_scan/nmap.results.</p><h2 id="Scan-your-Target-for-Open-UDP-Ports"><a href="#Scan-your-Target-for-Open-UDP-Ports" class="headerlink" title="Scan your Target for Open UDP Ports"></a>Scan your Target for Open UDP Ports</h2><p>Setting Up the Packet Capture</p><figure class="highlight plain"><table><tr><td class="gutter"><pre><div class="line">1</div></pre></td><td class="code"><pre><div class="line">sudo tcpdump host target_ip_addr -w ~/scan_results/udp_scan/packets</div></pre></td></tr></table></figure><p>Run the UDP Scan</p><figure class="highlight plain"><table><tr><td class="gutter"><pre><div class="line">1</div></pre></td><td class="code"><pre><div class="line">sudo nmap -sU -Pn -p- -T4 -vv --reason -oN ~/scan_results/udp_scan/nmap.results target_ip_addr</div></pre></td></tr></table></figure><p>The results are saved in ~/scan_results/syn_scan/nmap.results.</p><h2 id="Host-and-Service-Discovery"><a href="#Host-and-Service-Discovery" class="headerlink" title="Host and Service Discovery"></a>Host and Service Discovery</h2><p>Discovering the Versions of Services on the Server</p><figure class="highlight plain"><table><tr><td class="gutter"><pre><div class="line">1</div></pre></td><td class="code"><pre><div class="line">sudo nmap -sV -Pn -p 22,80 -vv --reason -oN ~/scan_results/versions/service_versions.nmap target_ip_addr</div></pre></td></tr></table></figure><p>Discovering the Host Operating System</p><figure class="highlight plain"><table><tr><td class="gutter"><pre><div class="line">1</div></pre></td><td class="code"><pre><div class="line">sudo nmap -O -Pn -vv --reason -oN ~/scan_results/versions/os_version.nmap target_ip_addr</div></pre></td></tr></table></figure><h1 id="References"><a href="#References" class="headerlink" title="References"></a>References</h1><ul><li><a href="https://www.digitalocean.com/community/tutorials/how-the-iptables-firewall-works" target="_blank" rel="external">https://www.digitalocean.com/community/tutorials/how-the-iptables-firewall-works</a></li><li><a href="https://www.digitalocean.com/community/tutorials/how-to-set-up-a-firewall-using-iptables-on-ubuntu-14-04" target="_blank" rel="external">https://www.digitalocean.com/community/tutorials/how-to-set-up-a-firewall-using-iptables-on-ubuntu-14-04</a></li><li><a href="https://www.digitalocean.com/community/tutorials/how-to-list-and-delete-iptables-firewall-rules" target="_blank" rel="external">https://www.digitalocean.com/community/tutorials/how-to-list-and-delete-iptables-firewall-rules</a></li></ul>]]></content>
    
    <summary type="html">
    
      &lt;h1 id=&quot;How-iptables-Works&quot;&gt;&lt;a href=&quot;#How-iptables-Works&quot; class=&quot;headerlink&quot; title=&quot;How iptables Works&quot;&gt;&lt;/a&gt;How iptables Works&lt;/h1&gt;&lt;p&gt;&lt;code&gt;iptables&lt;/code&gt; works by matching each packet that crosses the networking interface against a set of &lt;code&gt;rules&lt;/code&gt; (grouped by &lt;code&gt;chains&lt;/code&gt;) to decide what to do (called &lt;code&gt;target&lt;/code&gt;).&lt;/p&gt;&lt;h2 id=&quot;rules&quot;&gt;&lt;a href=&quot;#rules&quot; class=&quot;headerlink&quot; title=&quot;rules&quot;&gt;&lt;/a&gt;rules&lt;/h2&gt;&lt;p&gt;The iptables firewall operates by comparing network traffic against a set of &lt;code&gt;rules&lt;/code&gt;. The rules define the characteristics that a packet must have to match the rule, and the action that should be taken for matching packets.&lt;/p&gt;&lt;h2 id=&quot;chains&quot;&gt;&lt;a href=&quot;#chains&quot; class=&quot;headerlink&quot; title=&quot;chains&quot;&gt;&lt;/a&gt;chains&lt;/h2&gt;&lt;p&gt;These rules are organized into groups called &lt;code&gt;chains&lt;/code&gt;. A chain is a set of rules that a packet is checked against sequentially. When the packet matches one of the rules, it executes the associated action and is not checked against the remaining rules in the chain.&lt;br&gt;A user can create chains as needed. There are three chains defined by default. They are:&lt;br&gt;· &lt;strong&gt;INPUT&lt;/strong&gt;: This chain handles all packets that are addressed to your server.&lt;br&gt;· &lt;strong&gt;OUTPUT&lt;/strong&gt;: This chain contains rules for traffic created by your server.&lt;br&gt;· &lt;strong&gt;FORWARD&lt;/strong&gt;: This chain is used to deal with traffic destined for other servers that are not created on your server.&lt;br&gt;
    
    </summary>
    
      <category term="IT" scheme="https://en.atjason.com/categories/IT/"/>
    
    
  </entry>
  
  <entry>
    <title>Google Analytics for Mac</title>
    <link href="https://en.atjason.com/Cocoa/MacGoogleAnalytics.html"/>
    <id>https://en.atjason.com/Cocoa/MacGoogleAnalytics.html</id>
    <published>2016-05-13T14:48:21.000Z</published>
    <updated>2016-12-06T01:51:54.000Z</updated>
    
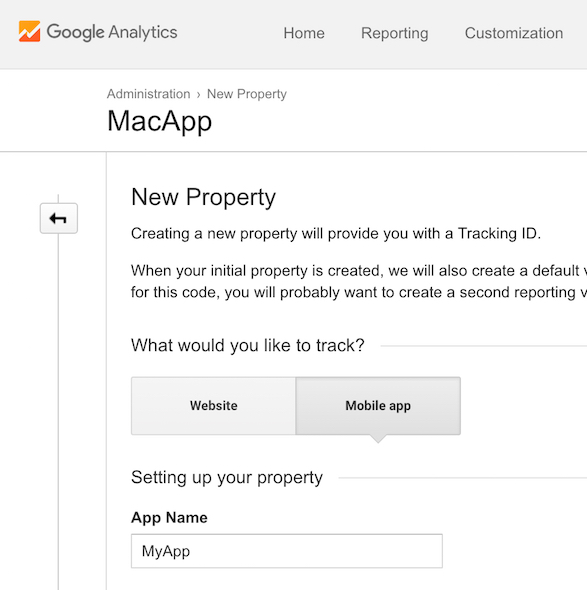
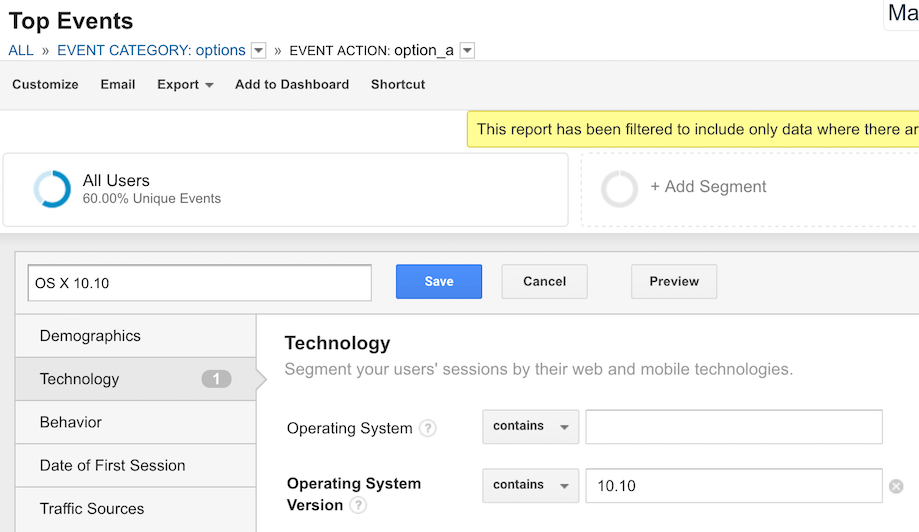
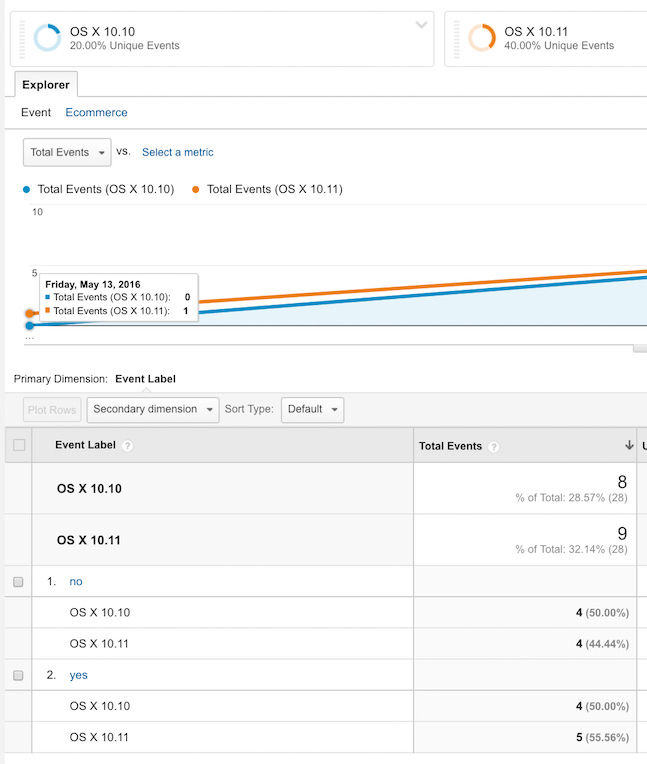
    <content type="html"><![CDATA[<p><img src="https://farm6.staticflickr.com/5480/30640898503_aac74e79f3_o.jpg" alt="07:34:46 AM"></p><p><a href="https://github.com/atjason/MacGoogleAnalytics" target="_blank" rel="external">MacGoogleAnalytics</a> is an open source library to use Google Analytics on Mac OS X.</p><h1 id="Introduction"><a href="#Introduction" class="headerlink" title="Introduction"></a>Introduction</h1><p>As we know, Google Analytics is perfect for user data collection and analytics. But unfortunately, there’s no official SDK for Mac OS X.</p><p>But still, there’re several ways to use Google Analytics on Mac OS X. MacGoogleAnalytics may be what you found.</p><p>Overall, there’re 2 parts work together to use Google Analytics.</p><ul><li><p>HTML File</p><ul><li>This is the real place to send data to Google Analytics server. It uses Google Analytics’s standard JavaScript API.</li></ul></li><li><p>Mac OS X Part</p><ul><li>In Mac OS X side, it loads the html file just mentioned. Send data like event to the html file as parameters. And then these data will be send in the html file through the JavaScript API.</li></ul></li></ul><a id="more"></a><h1 id="HTML-File"><a href="#HTML-File" class="headerlink" title="HTML File"></a>HTML File</h1><p>You can find the html file in <code>source &gt; html &gt; gapp.html</code>.</p><h2 id="Parameter-of-HTML-File"><a href="#Parameter-of-HTML-File" class="headerlink" title="Parameter of HTML File"></a>Parameter of HTML File</h2><p>The parameter of the html file is exactly the same with normal html file.</p><figure class="highlight html"><table><tr><td class="gutter"><pre><div class="line">1</div></pre></td><td class="code"><pre><div class="line">/gapp.html?param1=paramValue1&amp;param2=paramValue2&amp;...</div></pre></td></tr></table></figure><p>Demo of the html file with full parameters:</p><figure class="highlight html"><table><tr><td class="gutter"><pre><div class="line">1</div></pre></td><td class="code"><pre><div class="line">/gapp.html?id=UA-12345678-1&amp;name=ihosts&amp;version=1.1.0&amp;ca=menu&amp;ev=click&amp;la=rate</div></pre></td></tr></table></figure><p>Here are the supported parameter list.</p><ul><li><code>id</code><ul><li>The Google Analytics id, e.g., ‘UA-12345678-1’.</li><li><strong>Note</strong>: When you create a Google Analytics id, use the ‘<strong>Mobile app</strong>‘, but not ‘Website’.</li></ul></li></ul><p><img src="https://farm6.staticflickr.com/5515/31303401402_e86397a3e5_o.jpg" alt="1759091"></p><ul><li><code>name</code><ul><li>The product name, e.g., ‘ihosts’ for <a href="http://ex.toolinbox.net/ga/url.html?utm_medium=ihosts&amp;utm_source=GitHub&amp;id=UA-26569268-10&amp;url=https%3a%2f%2fitunes.apple.com%2fapp%2fid1102004240%3fls%3d1%26mt%3d12" target="_blank" rel="external">iHosts</a>. You can track different products using same Google Analytics id, even I don’t suggest you do that.</li></ul></li><li><code>version</code><ul><li>The app’s version, e.g., ‘1.2.1’.</li></ul></li><li><code>ca</code> (<em>optional</em>)<ul><li>The Google Analytics event category name.</li></ul></li><li><code>ev</code> (<em>optional</em>)<ul><li>The Google Analytics event action name.</li></ul></li><li><code>la</code> (<em>optional</em>)<ul><li>The Google Analytics event label value.</li></ul></li></ul><p><strong>Note</strong>: The full url include the parameters will be encoded. So no need to worry about the characters are valid or not. They will all be valid.</p><h2 id="Deploy-the-HTML-File"><a href="#Deploy-the-HTML-File" class="headerlink" title="Deploy the HTML File"></a>Deploy the HTML File</h2><p>The html file should be deployed to a domain before it can be accessed. I deployed it at GitHub with my domain, you can feel free to use it.</p><figure class="highlight html"><table><tr><td class="gutter"><pre><div class="line">1</div></pre></td><td class="code"><pre><div class="line">http://atjason.com/MacGoogleAnalytics/gapp.html</div></pre></td></tr></table></figure><p>You can also deploy it to your server with your domain.</p><p><strong>Tip</strong>: you may want to reduce the html file size by compressing the JavaScript code in it. Thus it will be faster to download.</p><h1 id="Mac-OS-X-Part"><a href="#Mac-OS-X-Part" class="headerlink" title="Mac OS X Part"></a>Mac OS X Part</h1><p>There’s only 2 files needed for Mac OS X part: <code>GoogleAnalytics.swift</code> and <code>GoogleAnalytics.swift</code>.</p><h2 id="GoogleAnalytics-swift"><a href="#GoogleAnalytics-swift" class="headerlink" title="GoogleAnalytics.swift"></a>GoogleAnalytics.swift</h2><p>Good news is, you even don’t need to touch this file.</p><p>This is the key file to integrate with Google Analytics. If you read the code, you will find it in fact loads the html file in a WebView, and combine the data as parameters for the html.</p><h2 id="GoogleAnalyticsHelper-swift"><a href="#GoogleAnalyticsHelper-swift" class="headerlink" title="GoogleAnalyticsHelper.swift"></a>GoogleAnalyticsHelper.swift</h2><p>This class help you easily use Google Analytics.</p><p>Don’t worry, you only need to update these properties:</p><ul><li><code>GAID</code><ul><li>The Google Analytics id, e.g., ‘UA-12345678-1’. This is the ‘id’ used as parameter of html file.</li></ul></li><li><code>GAName</code><ul><li>The product name, e.g., ‘ihosts’ for <strong>TODO iHosts Link</strong>. This is the ‘name’ used as parameter of html file.</li></ul></li><li><code>PingURL</code><ul><li>The full url of gapp.html, e.g., ‘<a href="http://atjason.com/MacGoogleAnalytics/gapp.html" target="_blank" rel="external">http://atjason.com/MacGoogleAnalytics/gapp.html</a>‘ mentioned above, or the url you deployed.</li></ul></li><li><code>PingTimeInterval</code><ul><li>By default it’s 6h. It means telling Google Analytics every 6h that ‘hey, I’m alive’. This will help Google Analytics to calculate the active users.</li></ul></li></ul><h1 id="Demo-Project-Using-Swift"><a href="#Demo-Project-Using-Swift" class="headerlink" title="Demo Project Using Swift"></a>Demo Project Using Swift</h1><p>How to integrate MacGoogleAnalytics in your project? Just put the <code>GoogleAnalytics.swift</code> and <code>GoogleAnalyticsHelper.swift</code> in your project.</p><p>Then, you need to start Google Analytics when app finished launching, stop it when app will terminate.</p><figure class="highlight swift"><table><tr><td class="gutter"><pre><div class="line">1</div><div class="line">2</div><div class="line">3</div><div class="line">4</div><div class="line">5</div><div class="line">6</div><div class="line">7</div></pre></td><td class="code"><pre><div class="line"><span class="function"><span class="keyword">func</span> <span class="title">applicationDidFinishLaunching</span><span class="params">(aNotification: NSNotification)</span></span> &#123;    </div><div class="line">  <span class="type">GAHelper</span>.startGoogleAnalytics()</div><div class="line">&#125;</div><div class="line">  </div><div class="line"><span class="function"><span class="keyword">func</span> <span class="title">applicationWillTerminate</span><span class="params">(notification: NSNotification)</span></span> &#123;</div><div class="line">  <span class="type">GAHelper</span>.stopGoogleAnalytics()</div><div class="line">&#125;</div></pre></td></tr></table></figure><p>The main usage of Google Analytics is to send event. How to send the event? Just as simple as following code.</p><figure class="highlight swift"><table><tr><td class="gutter"><pre><div class="line">1</div></pre></td><td class="code"><pre><div class="line"><span class="type">GA</span>.sendEvent(<span class="string">"menu"</span>, event: <span class="string">"click"</span>, label: <span class="string">"rate"</span>)</div></pre></td></tr></table></figure><p>That’s all.</p><h2 id="Work-With-HTTP"><a href="#Work-With-HTTP" class="headerlink" title="Work With HTTP"></a>Work With HTTP</h2><p>When run your project with MacGoogleAnalytics, you may meet this error:</p><p><em>App Transport Security has blocked a cleartext HTTP (http://) resource load since it is insecure. Temporary exceptions can be configured via your app’s Info.plist file.</em></p><p>Apple disable http access by default for security reason. If you really need to use http, could manually allow it. Open <code>Info.plist</code>, and add the following lines:</p><figure class="highlight swift"><table><tr><td class="gutter"><pre><div class="line">1</div><div class="line">2</div><div class="line">3</div><div class="line">4</div><div class="line">5</div></pre></td><td class="code"><pre><div class="line">&lt;key&gt;<span class="type">NSAppTransportSecurity</span>&lt;/key&gt;</div><div class="line">&lt;dict&gt;</div><div class="line">&lt;key&gt;<span class="type">NSAllowsArbitraryLoads</span>&lt;/key&gt;</div><div class="line">&lt;<span class="literal">true</span>/&gt;</div><div class="line">&lt;/dict&gt;</div></pre></td></tr></table></figure><p>Please keep in mind that this solution should be your last resort. You’d ideally want to enable HTTPS on your service, or next, whitelist domains on which you want HTTP and if none of this is possible, then use this approach.</p><h1 id="Demo-Project-Using-Objective-C"><a href="#Demo-Project-Using-Objective-C" class="headerlink" title="Demo Project Using Objective C"></a>Demo Project Using Objective C</h1><p>TODO</p><h1 id="View-Data-in-Google-Analytics-Site"><a href="#View-Data-in-Google-Analytics-Site" class="headerlink" title="View Data in Google Analytics Site"></a>View Data in Google Analytics Site</h1><p>After data are collected, you can view them in Google Analytics as normal: <a href="https://analytics.google.com/analytics/web/" target="_blank" rel="external">https://analytics.google.com/analytics/web/</a>. During debug, you can also check whether it works or not in ‘Real-Time’.</p><p>Just give a tip for OS X version. In the demo app using swift, it collect event of <code>options &gt; option_a &gt; yes or no</code>. You may want to know, how many users enable this option in OS X 10.10 and how many for 10.11. How to do it?</p><p>Open the <code>Behavior &gt; Events &gt; Top Events</code>, select <code>options &gt; option_a</code>. Here you should be able to see all the events. Then add a new custom Segment, in <code>Technology &gt; Operating System Version</code>, add <em>contains</em> ‘10.10’, save it as ‘OS X 10.10’. Add another Segment for ‘OS X 10.11’.</p><p><img src="https://farm6.staticflickr.com/5498/31078292470_a765cb4e35_o.jpg" alt="1747211"></p><p>And then, apply the Segments, it could distinguish the data of OS X 10.10 or 10.11.</p><p><img src="https://farm6.staticflickr.com/5803/31332912121_210a6b0bd5_o.jpg" alt="1750021"></p><h1 id="Release-on-Mac-App-Store"><a href="#Release-on-Mac-App-Store" class="headerlink" title="Release on Mac App Store"></a>Release on Mac App Store</h1><p>Yes, this way could be released on Mac App Store. In fact, these of my apps have already released on Mac App Store.</p><ul><li><a href="http://ex.toolinbox.net/ga/url.html?utm_medium=ihosts&amp;utm_source=GitHub&amp;id=UA-26569268-10&amp;url=https%3a%2f%2fitunes.apple.com%2fapp%2fid1102004240%3fls%3d1%26mt%3d12" target="_blank" rel="external">iHosts</a></li><li><a href="http://ex.toolinbox.net/ga/url.html?utm_medium=clip&amp;utm_source=GitHub&amp;id=UA-26569268-10&amp;url=https%3a%2f%2fitunes.apple.com%2fapp%2fid1056935452%3fls%3d1%26mt%3d12" target="_blank" rel="external">Daily Clipboard</a></li><li><a href="http://ex.toolinbox.net/ga/url.html?utm_medium=timer&amp;utm_source=GitHub&amp;id=UA-26569268-10&amp;url=https%3a%2f%2fitunes.apple.com%2fapp%2fid1062139745%3fls%3d1%26mt%3d12" target="_blank" rel="external">Attention Timer</a></li></ul><h2 id="Show-Your-Product"><a href="#Show-Your-Product" class="headerlink" title="Show Your Product"></a>Show Your Product</h2><p>If your product using MacGoogleAnalytics and you’d like to share it here, pull requests welcome :)</p><h1 id="Donate"><a href="#Donate" class="headerlink" title="Donate"></a>Donate</h1><p>If you think Mac Google Analytics is helpful for you, welcome to <a href="https://www.paypal.com/cgi-bin/webscr?cmd=_xclick&amp;business=quietjason%40gmail%2ecom&amp;lc=US&amp;item_name=Mac%20Google%20Analytics&amp;button_subtype=services&amp;currency_code=USD&amp;bn=PP%2dBuyNowBF%3abtn_buynow_SM%2egif%3aNonHosted" target="_blank" rel="external">donate</a> :)</p>]]></content>
    
    <summary type="html">
    
      &lt;p&gt;&lt;img src=&quot;https://farm6.staticflickr.com/5480/30640898503_aac74e79f3_o.jpg&quot; alt=&quot;07:34:46 AM&quot;&gt;&lt;/p&gt;&lt;p&gt;&lt;a href=&quot;https://github.com/atjason/MacGoogleAnalytics&quot;&gt;MacGoogleAnalytics&lt;/a&gt; is an open source library to use Google Analytics on Mac OS X.&lt;/p&gt;&lt;h1 id=&quot;Introduction&quot;&gt;&lt;a href=&quot;#Introduction&quot; class=&quot;headerlink&quot; title=&quot;Introduction&quot;&gt;&lt;/a&gt;Introduction&lt;/h1&gt;&lt;p&gt;As we know, Google Analytics is perfect for user data collection and analytics. But unfortunately, there’s no official SDK for Mac OS X.&lt;/p&gt;&lt;p&gt;But still, there’re several ways to use Google Analytics on Mac OS X. MacGoogleAnalytics may be what you found.&lt;/p&gt;&lt;p&gt;Overall, there’re 2 parts work together to use Google Analytics.&lt;/p&gt;&lt;ul&gt;&lt;li&gt;&lt;p&gt;HTML File&lt;/p&gt;&lt;ul&gt;&lt;li&gt;This is the real place to send data to Google Analytics server. It uses Google Analytics’s standard JavaScript API.&lt;/li&gt;&lt;/ul&gt;&lt;/li&gt;&lt;li&gt;&lt;p&gt;Mac OS X Part&lt;/p&gt;&lt;ul&gt;&lt;li&gt;In Mac OS X side, it loads the html file just mentioned. Send data like event to the html file as parameters. And then these data will be send in the html file through the JavaScript API.&lt;/li&gt;&lt;/ul&gt;&lt;/li&gt;&lt;/ul&gt;
    
    </summary>
    
      <category term="Cocoa" scheme="https://en.atjason.com/categories/Cocoa/"/>
    
    
  </entry>
  
  <entry>
    <title>Action When Enter-key is Pressed on NSTextField</title>
    <link href="https://en.atjason.com/Cocoa/Action%20When%20Enter-key%20is%20Pressed%20on%20NSTextField.html"/>
    <id>https://en.atjason.com/Cocoa/Action When Enter-key is Pressed on NSTextField.html</id>
    <published>2016-04-17T03:45:00.000Z</published>
    <updated>2016-12-06T01:51:54.000Z</updated>
    
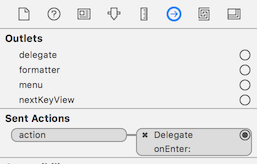
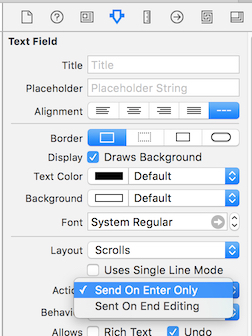
    <content type="html"><![CDATA[<h1 id="Add-Action-in-NSTextField’s-Delegate"><a href="#Add-Action-in-NSTextField’s-Delegate" class="headerlink" title="Add Action in NSTextField’s Delegate"></a>Add Action in NSTextField’s Delegate</h1><figure class="highlight swift"><table><tr><td class="gutter"><pre><div class="line">1</div><div class="line">2</div><div class="line">3</div></pre></td><td class="code"><pre><div class="line"><span class="meta">@IBAction</span> <span class="function"><span class="keyword">func</span> <span class="title">textFieldAction</span><span class="params">(sender: NSTextField)</span></span> &#123;</div><div class="line">    <span class="built_in">print</span>(sender.stringValue)</div><div class="line">&#125;</div></pre></td></tr></table></figure><h1 id="Connect-NSTextField’s-Action-to-Delegate’s-One"><a href="#Connect-NSTextField’s-Action-to-Delegate’s-One" class="headerlink" title="Connect NSTextField’s Action to Delegate’s One"></a>Connect NSTextField’s Action to Delegate’s One</h1><p><img src="https://farm6.staticflickr.com/5590/31332905111_a99db6b132_o.jpg" alt=""></p><h1 id="Set-NSTextField’s-Action-Type"><a href="#Set-NSTextField’s-Action-Type" class="headerlink" title="Set NSTextField’s Action Type"></a>Set NSTextField’s Action Type</h1><p><img src="https://farm6.staticflickr.com/5718/31078290500_78ea9682e5_o.jpg" alt=""></p>]]></content>
    
    <summary type="html">
    
      &lt;h1 id=&quot;Add-Action-in-NSTextField’s-Delegate&quot;&gt;&lt;a href=&quot;#Add-Action-in-NSTextField’s-Delegate&quot; class=&quot;headerlink&quot; title=&quot;Add Action in NSText
    
    </summary>
    
      <category term="Cocoa" scheme="https://en.atjason.com/categories/Cocoa/"/>
    
    
  </entry>
  
  <entry>
    <title>XCode Debug Flag for Swift</title>
    <link href="https://en.atjason.com/Cocoa/XCode%20Debug%20Flag%20for%20Swift.html"/>
    <id>https://en.atjason.com/Cocoa/XCode Debug Flag for Swift.html</id>
    <published>2016-04-16T12:34:00.000Z</published>
    <updated>2016-12-06T01:51:54.000Z</updated>
    
    <content type="html"><![CDATA[<h1 id="Set-Debug-Flag-in-XCode-for-Swift"><a href="#Set-Debug-Flag-in-XCode-for-Swift" class="headerlink" title="Set Debug Flag in XCode for Swift"></a>Set Debug Flag in XCode for Swift</h1><ul><li>Open ‘Build Settings’ for Project (not target)</li><li>Search ‘<strong>Swift Compiler - Custom Flags</strong>‘. Add a <code>-D DEBUG</code> entry in <code>Other Swift Flags</code></li></ul><p><img src="https://farm6.staticflickr.com/5572/31412018886_aa02727ba9_o.jpg" alt=""></p><h1 id="Use-Debug-Flag-in-Swift"><a href="#Use-Debug-Flag-in-Swift" class="headerlink" title="Use Debug Flag in Swift"></a>Use Debug Flag in Swift</h1><figure class="highlight swift"><table><tr><td class="gutter"><pre><div class="line">1</div><div class="line">2</div><div class="line">3</div><div class="line">4</div><div class="line">5</div></pre></td><td class="code"><pre><div class="line">#<span class="keyword">if</span> <span class="type">DEBUG</span></div><div class="line">    <span class="built_in">print</span>(<span class="string">"I'm running in DEBUG mode"</span>)</div><div class="line">#<span class="keyword">else</span></div><div class="line">    <span class="built_in">print</span>(<span class="string">"I'm running in a non-DEBUG mode"</span>)</div><div class="line">#endif</div></pre></td></tr></table></figure>]]></content>
    
    <summary type="html">
    
      &lt;h1 id=&quot;Set-Debug-Flag-in-XCode-for-Swift&quot;&gt;&lt;a href=&quot;#Set-Debug-Flag-in-XCode-for-Swift&quot; class=&quot;headerlink&quot; title=&quot;Set Debug Flag in XCode fo
    
    </summary>
    
      <category term="Cocoa" scheme="https://en.atjason.com/categories/Cocoa/"/>
    
    
  </entry>
  
  <entry>
    <title>Swift &amp; Cocoa: Localization</title>
    <link href="https://en.atjason.com/Cocoa/SwiftCocoa_Localization.html"/>
    <id>https://en.atjason.com/Cocoa/SwiftCocoa_Localization.html</id>
    <published>2016-04-15T04:20:00.000Z</published>
    <updated>2016-12-06T01:51:54.000Z</updated>
    
    <content type="html"><![CDATA[<p>This article records the detailed steps to add localizations for a project. The project could be downloaded <a href="https://github.com/atjason/LearnCocoaWithSwift/tree/master/26_LocalizationAndBundles/LocalizationDemo" target="_blank" rel="external">here</a>.</p><p>Development environment:</p><ul><li>OS X: 10.11.4</li><li>XCode: 7.3</li><li>Swift: 2.2</li></ul><h1 id="Auto-Layout-and-Double-Length-Pseudolanguage"><a href="#Auto-Layout-and-Double-Length-Pseudolanguage" class="headerlink" title="Auto Layout and Double-Length Pseudolanguage"></a>Auto Layout and Double-Length Pseudolanguage</h1><p>For localized app, typically you need to set the UI to ‘<strong>Auto Layout</strong>‘. As the same string in different languages may have very different length, the ‘auto layout’ could let each language corecttly display.</p><p>How to test the auto layout correclty work or not? Beside really test the app with different language, you can also use ‘<strong>Double-Length Pseudolanguage</strong>‘. This localization simply takes the text of your development language, and doubles it. So, for example, “Tell the World” becomes “Tell the World Tell the World.” While many pieces of text won’t actually double in length when translated to another langauge, it serves as a great way to test to see whether your interface can handle the wide variation in length.</p><p>Steps to preview a localization in Interface Builder:</p><ul><li>In project navigator, select the <code>.storyboard</code> or <code>.xib</code> file you want to preview.</li><li>Choose View &gt; Assistant Editor &gt; Show Assistant Editor.</li><li>In the assistant editor jump bar, open the Assistant pop-up menu, scroll to and choose the Preview item, and choose the <code>.storyboard</code> or <code>.xib</code> file from the submenu.<br>If a preview of the app’s user interface doesn’t appear in the assistant editor, select the window or view you want to preview in the icon or outline view.</li></ul><p><img src="https://farm6.staticflickr.com/5492/31332955981_38d0c95ea2_o.jpg" alt=""></p><ul><li>In the assistant editor, choose the localization you want to preview from the language pop-up menu in the lower-right corner.</li></ul><p><img src="https://farm6.staticflickr.com/5478/31332957421_18d7c7e146_o.jpg" alt=""></p><p>Now, a preview of the localization appears in the assistant editor. If you choose a real language, strings that do not need to be localized or need to be localized, but currently are not, appear in uppercase.</p><a id="more"></a><h1 id="Use-Localized-String-in-Code"><a href="#Use-Localized-String-in-Code" class="headerlink" title="Use Localized String in Code"></a>Use Localized String in Code</h1><p>The key is to use <code>NSLocalizedString</code> function. It could load localized text from the localized string file.</p><p>To explicit ordering of tokens in format strings, could use <code>%1$@</code>, <code>%2$@</code>, etc.</p><p>The related code is:</p><figure class="highlight swift"><table><tr><td class="gutter"><pre><div class="line">1</div><div class="line">2</div><div class="line">3</div><div class="line">4</div><div class="line">5</div><div class="line">6</div><div class="line">7</div><div class="line">8</div><div class="line">9</div></pre></td><td class="code"><pre><div class="line"><span class="function"><span class="keyword">func</span> <span class="title">setLabelStrings</span><span class="params">()</span></span> &#123;</div><div class="line">  <span class="keyword">let</span> dateFormatter = <span class="type">NSDateFormatter</span>()</div><div class="line">  dateFormatter.dateStyle = .<span class="type">NoStyle</span></div><div class="line">  dateFormatter.timeStyle = .<span class="type">ShortStyle</span></div><div class="line">  <span class="keyword">let</span> dateString = dateFormatter.stringFromDate(<span class="type">NSDate</span>())</div><div class="line">  </div><div class="line">  question = <span class="type">NSLocalizedString</span>(<span class="string">"Q: What's the time now?"</span>, comment: <span class="string">"Question"</span>)</div><div class="line">  answer = <span class="type">String</span>(format: <span class="type">NSLocalizedString</span>(<span class="string">"A: It's %@."</span>, comment: <span class="string">"Answer"</span>), dateString)</div><div class="line">&#125;</div></pre></td></tr></table></figure><h1 id="Add-Localization-Language-for-Project"><a href="#Add-Localization-Language-for-Project" class="headerlink" title="Add Localization Language for Project"></a>Add Localization Language for Project</h1><p>Add a new localization to the project could make Xcode aware that you want to start translating files into that language, which means you can do things like select that language in the Preview assistant.</p><ul><li>Select the project in the project navigator.<br>Note: It’s <strong>PROJECT</strong>, but not targets.</li><li>Add the new localization.<br>Scroll down to the Localizations section. Click the + button, and select ‘Chinese (Simplified)’ from the menu that appears</li></ul><p><img src="https://farm6.staticflickr.com/5679/31303446882_c1012c8d8a_o.jpg" alt=""></p><ul><li>Select the files you want to localize.<br>Xcode will ask you which files you want to translate into the new language. At this stage, there will only be a single file: the app’s interface, stored in MainMenu.xib. It’s selected by default, so click Finish.<br>Note: select “Locializable Strings”, but not ‘Interface Builder Story’.</li></ul><p><img src="https://farm6.staticflickr.com/5490/31332962201_b2a8d2bcf7_o.jpg" alt=""></p><ul><li>A new file will be created: a strings file for the storyboard file. It’ll appear as an item inside the storyboard file, in the project navigator.</li></ul><p><img src="https://farm6.staticflickr.com/5767/30640950723_98e5a10244_o.jpg" alt=""></p><h1 id="Add-Localizations-Files"><a href="#Add-Localizations-Files" class="headerlink" title="Add Localizations Files"></a>Add Localizations Files</h1><p>To well organize the localized strings, it’s better we manually add 2 string files here: ‘<strong>Localizable.strings</strong>‘ and ‘<strong>InfoPlist.strings</strong>‘. ‘Localizable.strings’ will store the strings in app. For ‘InfoPlist.strings’, please check the following introduction.</p><h2 id="Localizing-Property-List-Values"><a href="#Localizing-Property-List-Values" class="headerlink" title="Localizing Property List Values"></a>Localizing Property List Values</h2><p>The values for many keys in an information property list file are human-readable strings that are displayed to the user by the Finder or your own app. When you localize your app, you should be sure to localize the values for these strings in addition to the rest of your app’s content.</p><p>Localized values are not stored in the Info.plist file itself. Instead, you store the values for a particular localization in a strings file with the name ‘<strong>InfoPlist.strings</strong>‘. You place this file in the same language-specific project directory that you use to store other resources for the same localization. The contents of the InfoPlist.strings file are the individual keys you want localized and the appropriately translated value. The routines that look up key values in the Info.plist file take the user’s language preferences into account and return the localized version of the key (from the appropriate InfoPlist.strings file) when one exists. If a localized version of a key does not exist, the routines return the value stored in the Info.plist file.</p><h2 id="Add-‘Localizable-strings’-and-‘InfoPlist-strings’"><a href="#Add-‘Localizable-strings’-and-‘InfoPlist-strings’" class="headerlink" title="Add ‘Localizable.strings’ and ‘InfoPlist.strings’"></a>Add ‘Localizable.strings’ and ‘InfoPlist.strings’</h2><p>Before add the strings files, it’s better to add a ‘Localizations’ group in project. And it’s also better to create the corresponding folder in Finder.</p><p>Now it’s time really add the string files.</p><ul><li>Create a new file in the project: a strings file. You’ll find this in the Resource section of the file templates. Name the file as ‘Localizable.strings’, save in the ‘Localizations’ folder.</li></ul><p><img src="https://farm6.staticflickr.com/5469/30640952433_455ecfa8a2_o.jpg" alt=""></p><ul><li>Select the ‘Localizable.strings’ file. Open the ‘File Inspector’ and scroll down to Localizations.<br>Click the Localize button. A menu will appear; choose Base and click Localize.</li></ul><p>Now the localization option has changed, with three small checkboxes, one for Base, one for English, and the last for Chinese Simplified. Select Base and Chinese Simplified. In fact the Base is just English as we choose English as development language.</p><p><img src="https://farm6.staticflickr.com/5810/31448864545_333ce2df10_o.jpg" alt=""></p><p>Now create ‘InfoPlist.strings’ and did same settings as ‘Localizable.strings’. The difference is, save the ‘InfoPlist.strings’ in same level of ‘Localizations’ in Finder, but still in the ‘Localizations’ group in project. After set it as localization, it will auto matically be moved to ‘Base.lproj’ and ‘zh-Hans.lproj’ in Finder.</p><p>How to localize the app’s name displayed with app icon in Finder? Add this string in Base version of ‘InfoPlist.strings’:<br></p><figure class="highlight swift"><table><tr><td class="gutter"><pre><div class="line">1</div><div class="line">2</div></pre></td><td class="code"><pre><div class="line"><span class="comment">/* App Name */</span></div><div class="line"><span class="string">"CFBundleDisplayName"</span> =<span class="string">"Localization Demo"</span>;</div></pre></td></tr></table></figure><p></p><p>And add this for the Chinese Simplified version:<br></p><figure class="highlight swift"><table><tr><td class="gutter"><pre><div class="line">1</div><div class="line">2</div></pre></td><td class="code"><pre><div class="line"><span class="comment">/* App Name */</span></div><div class="line"><span class="string">"CFBundleDisplayName"</span> =<span class="string">"本地化示例"</span>;</div></pre></td></tr></table></figure><p></p><p><strong>NOTE</strong><br>It’s important to use the file names of ‘InfoPlist.strings’ and ‘Localizable.strings’, as the app will look for the files with these names.</p><p>After added, the files in Finder will looks like:</p><p><img src="https://farm6.staticflickr.com/5478/31332974201_b42e64ca18_o.jpg" alt=""></p><h1 id="Edit-Localization-Files"><a href="#Edit-Localization-Files" class="headerlink" title="Edit Localization Files"></a>Edit Localization Files</h1><p>There’re 2 ways to edit the localization files: Direclty Edit and Using .xliff Files. Now let’s introduce the .xliff files.</p><p>Normally, you don’t translate the app by yourself, but let some others who are expert for the language to do it. How to cooperate with them? Use .xliff file.</p><h2 id="Export-xliff-Files"><a href="#Export-xliff-Files" class="headerlink" title="Export .xliff Files"></a>Export .xliff Files</h2><ul><li>Select the root of the project.</li><li>Select ‘Editor’ menu &gt; ‘Export for localization…’. In the popup dialog, select where to store the files. Need to select ‘Chinese (Simplied)’ in languages. This means export the .xliff file for the languages selected. Click ‘Save’.<br><img src="https://farm6.staticflickr.com/5691/31078327570_feba78b030_o.jpg" alt=""></li><li>Open the ‘zh-Hans.xliff’ you just saved. You can see it’s like a xml file.</li></ul><p>Edit parts for ‘Localizable.strings’. Find the following part, add <code>&lt;target&gt;...&lt;/target&gt;</code> under the <code>&lt;source&gt;A: It&#39;s %@.&lt;/source&gt;</code>. This is just the core of ‘localization’.</p><figure class="highlight xml"><table><tr><td class="gutter"><pre><div class="line">1</div><div class="line">2</div><div class="line">3</div><div class="line">4</div><div class="line">5</div><div class="line">6</div><div class="line">7</div><div class="line">8</div><div class="line">9</div><div class="line">10</div><div class="line">11</div><div class="line">12</div><div class="line">13</div><div class="line">14</div><div class="line">15</div><div class="line">16</div><div class="line">17</div></pre></td><td class="code"><pre><div class="line"><span class="tag">&lt;<span class="name">file</span> <span class="attr">original</span>=<span class="string">"LocalizationDemo/Localizable.strings"</span> <span class="attr">source-language</span>=<span class="string">"en"</span> <span class="attr">datatype</span>=<span class="string">"plaintext"</span> <span class="attr">target-language</span>=<span class="string">"zh-Hans"</span>&gt;</span></div><div class="line">  <span class="tag">&lt;<span class="name">header</span>&gt;</span></div><div class="line">    <span class="tag">&lt;<span class="name">tool</span> <span class="attr">tool-id</span>=<span class="string">"com.apple.dt.xcode"</span> <span class="attr">tool-name</span>=<span class="string">"Xcode"</span> <span class="attr">tool-version</span>=<span class="string">"7.3"</span> <span class="attr">build-num</span>=<span class="string">"7D175"</span>/&gt;</span></div><div class="line">  <span class="tag">&lt;/<span class="name">header</span>&gt;</span></div><div class="line">  <span class="tag">&lt;<span class="name">body</span>&gt;</span></div><div class="line">    <span class="tag">&lt;<span class="name">trans-unit</span> <span class="attr">id</span>=<span class="string">"A: It's %@."</span>&gt;</span></div><div class="line">      <span class="tag">&lt;<span class="name">source</span>&gt;</span>A: It's %@.<span class="tag">&lt;/<span class="name">source</span>&gt;</span></div><div class="line">      <span class="tag">&lt;<span class="name">target</span>&gt;</span>答：现在是 %@。<span class="tag">&lt;/<span class="name">target</span>&gt;</span></div><div class="line">      <span class="tag">&lt;<span class="name">note</span>&gt;</span>Answer<span class="tag">&lt;/<span class="name">note</span>&gt;</span></div><div class="line">    <span class="tag">&lt;/<span class="name">trans-unit</span>&gt;</span></div><div class="line">    <span class="tag">&lt;<span class="name">trans-unit</span> <span class="attr">id</span>=<span class="string">"Q: What's the time now?"</span>&gt;</span></div><div class="line">      <span class="tag">&lt;<span class="name">source</span>&gt;</span>Q: What's the time now?<span class="tag">&lt;/<span class="name">source</span>&gt;</span></div><div class="line">      <span class="tag">&lt;<span class="name">target</span>&gt;</span>问：现在几点了？<span class="tag">&lt;/<span class="name">target</span>&gt;</span></div><div class="line">      <span class="tag">&lt;<span class="name">note</span>&gt;</span>Question<span class="tag">&lt;/<span class="name">note</span>&gt;</span></div><div class="line">    <span class="tag">&lt;/<span class="name">trans-unit</span>&gt;</span></div><div class="line">  <span class="tag">&lt;/<span class="name">body</span>&gt;</span></div><div class="line"><span class="tag">&lt;/<span class="name">file</span>&gt;</span></div></pre></td></tr></table></figure><h2 id="Import-xliff-Files"><a href="#Import-xliff-Files" class="headerlink" title="Import .xliff Files"></a>Import .xliff Files</h2><ul><li>Select the root of the project.</li><li>Select ‘Editor’ menu &gt; ‘Import localization…’. In the popup dialog, select the ‘zh-Hans.xliff’ you just modified. It should pop up a dialog to show the difference between the files in project and the one you just modified. Click ‘Import’ if it’s fine.</li></ul><p><img src="https://farm6.staticflickr.com/5605/30640957953_36806f86e5_o.jpg" alt=""></p><p><img src="https://farm6.staticflickr.com/5454/31303456892_8d57017509_o.jpg" alt=""></p><p>After it’s done, open the ‘InfoPlist.strings’ or ‘Localizable.strings’, you should be able to say the new translated strings. Did you remember I just said there’re 2 ways to edit the string files, and another one is directly edit it? Here it is, you can directly edit the files and add the strings like you added through .xliff.</p><p><img src="https://farm6.staticflickr.com/5445/31332978651_ecd8828df2_o.jpg" alt=""></p><p><strong>Special Tips</strong><br>Seems XCode has issue. If you project has test or other target, if you import the modified strings for the first, the XCode may crash.<br>The solution is, export strings, don’t change it and import again.<br>I guess this mainly let the test or other project be localized. Even you don’t need to localize them, but have to do it to walk around XCode’s issue (again, it’s what I guess).</p><h1 id="Test-Localization"><a href="#Test-Localization" class="headerlink" title="Test Localization"></a>Test Localization</h1><p>There’re 2 ways to test the localization.</p><h2 id="1-Change-System’s-Language"><a href="#1-Change-System’s-Language" class="headerlink" title="1. Change System’s Language"></a>1. Change System’s Language</h2><p>Open ‘System Preferences’ &gt; ‘Language &amp; Region’, you can drag Chinese Simplied to top of the list to activate it. You can also change the ragion.</p><p><img src="https://farm6.staticflickr.com/5677/31332979431_dbc687c14f_o.jpg" alt=""></p><p>The disadvantage of this way is, you need to reboot to let the change work. And the entire system’s language will be changed. How only change the language for the app? Check the following way.</p><h2 id="2-Use-XCode’s-Scheme"><a href="#2-Use-XCode’s-Scheme" class="headerlink" title="2. Use XCode’s Scheme"></a>2. Use XCode’s Scheme</h2><p>You can make Xcode launch the application using the special langauge or region.<br>To do this, you can duplicate current scheme, name it as ‘Chinese (Simplified)’. Open the Options panel. Change the Application Language from System Language to ‘Chinese (Simplified)’.</p><p><img src="https://farm6.staticflickr.com/5330/31078329830_f6c84414f6_o.jpg" alt=""></p><p><img src="https://farm6.staticflickr.com/5597/30640961673_b18d314d89_o.jpg" alt=""></p><p>Now, run the app, it should look like:</p><p><img src="https://farm6.staticflickr.com/5557/31332983321_2bceaa1d40_o.jpg" alt=""></p>]]></content>
    
    <summary type="html">
    
      &lt;p&gt;This article records the detailed steps to add localizations for a project. The project could be downloaded &lt;a href=&quot;https://github.com/atjason/LearnCocoaWithSwift/tree/master/26_LocalizationAndBundles/LocalizationDemo&quot;&gt;here&lt;/a&gt;.&lt;/p&gt;&lt;p&gt;Development environment:&lt;/p&gt;&lt;ul&gt;&lt;li&gt;OS X: 10.11.4&lt;/li&gt;&lt;li&gt;XCode: 7.3&lt;/li&gt;&lt;li&gt;Swift: 2.2&lt;/li&gt;&lt;/ul&gt;&lt;h1 id=&quot;Auto-Layout-and-Double-Length-Pseudolanguage&quot;&gt;&lt;a href=&quot;#Auto-Layout-and-Double-Length-Pseudolanguage&quot; class=&quot;headerlink&quot; title=&quot;Auto Layout and Double-Length Pseudolanguage&quot;&gt;&lt;/a&gt;Auto Layout and Double-Length Pseudolanguage&lt;/h1&gt;&lt;p&gt;For localized app, typically you need to set the UI to ‘&lt;strong&gt;Auto Layout&lt;/strong&gt;‘. As the same string in different languages may have very different length, the ‘auto layout’ could let each language corecttly display.&lt;/p&gt;&lt;p&gt;How to test the auto layout correclty work or not? Beside really test the app with different language, you can also use ‘&lt;strong&gt;Double-Length Pseudolanguage&lt;/strong&gt;‘. This localization simply takes the text of your development language, and doubles it. So, for example, “Tell the World” becomes “Tell the World Tell the World.” While many pieces of text won’t actually double in length when translated to another langauge, it serves as a great way to test to see whether your interface can handle the wide variation in length.&lt;/p&gt;&lt;p&gt;Steps to preview a localization in Interface Builder:&lt;/p&gt;&lt;ul&gt;&lt;li&gt;In project navigator, select the &lt;code&gt;.storyboard&lt;/code&gt; or &lt;code&gt;.xib&lt;/code&gt; file you want to preview.&lt;/li&gt;&lt;li&gt;Choose View &amp;gt; Assistant Editor &amp;gt; Show Assistant Editor.&lt;/li&gt;&lt;li&gt;In the assistant editor jump bar, open the Assistant pop-up menu, scroll to and choose the Preview item, and choose the &lt;code&gt;.storyboard&lt;/code&gt; or &lt;code&gt;.xib&lt;/code&gt; file from the submenu.&lt;br&gt;If a preview of the app’s user interface doesn’t appear in the assistant editor, select the window or view you want to preview in the icon or outline view.&lt;/li&gt;&lt;/ul&gt;&lt;p&gt;&lt;img src=&quot;https://farm6.staticflickr.com/5492/31332955981_38d0c95ea2_o.jpg&quot; alt=&quot;&quot;&gt;&lt;/p&gt;&lt;ul&gt;&lt;li&gt;In the assistant editor, choose the localization you want to preview from the language pop-up menu in the lower-right corner.&lt;/li&gt;&lt;/ul&gt;&lt;p&gt;&lt;img src=&quot;https://farm6.staticflickr.com/5478/31332957421_18d7c7e146_o.jpg&quot; alt=&quot;&quot;&gt;&lt;/p&gt;&lt;p&gt;Now, a preview of the localization appears in the assistant editor. If you choose a real language, strings that do not need to be localized or need to be localized, but currently are not, appear in uppercase.&lt;/p&gt;
    
    </summary>
    
      <category term="Cocoa" scheme="https://en.atjason.com/categories/Cocoa/"/>
    
    
  </entry>
  
  <entry>
    <title>Swift &amp; Cocoa: Auto Launch at Login</title>
    <link href="https://en.atjason.com/Cocoa/SwiftCocoa_Auto%20Launch%20at%20Login.html"/>
    <id>https://en.atjason.com/Cocoa/SwiftCocoa_Auto Launch at Login.html</id>
    <published>2016-04-14T08:50:00.000Z</published>
    <updated>2016-12-06T01:51:54.000Z</updated>
    
    <content type="html"><![CDATA[<p>This article is based on this <a href="http://martiancraft.com/blog/2015/01/login-items/" target="_blank" rel="external">blog</a>. I adjust and implement using Swift. The project could be downloaded <a href="https://github.com/atjason/CocoaDemoWithSwift/tree/master/AutoLaunch" target="_blank" rel="external">here</a>.</p><p>Development environment:</p><ul><li>OS X: 10.11.4</li><li>XCode: 7.3</li><li>Swift: 2.2</li></ul><h1 id="Enable-‘launch-at-login’-in-Mac-App-Store"><a href="#Enable-‘launch-at-login’-in-Mac-App-Store" class="headerlink" title="Enable ‘launch at login’ in Mac App Store"></a>Enable ‘launch at login’ in Mac App Store</h1><p>Beside works in sandbox mode, to enable ‘launch at login’ in Mac App Store, should mee this requirement:</p><blockquote><p>2.26 Apps that are set to auto-launch or to have other code automatically run at startup or login without user consent will be rejected.</p></blockquote><p>How to deal with it?<br>Easy, just add a checkbox in Preferences to let user choose auto launch or not. And, make sure, do <strong>NOT</strong> enable it by default. Otherwise Apple will reject it (I was ever rejected for this reason).</p><p><img src="https://farm6.staticflickr.com/5486/31303440372_cb535ac1c7_o.jpg" alt=""></p><a id="more"></a><h1 id="Steps"><a href="#Steps" class="headerlink" title="Steps"></a>Steps</h1><p>The precondition is, you already setup your normal project.</p><h2 id="Add-New-Target-of-Helper"><a href="#Add-New-Target-of-Helper" class="headerlink" title="Add New Target of Helper"></a>Add New Target of Helper</h2><p>Add a new target of your project. You can name the target as “XHelper”, and “X” is your main project.<br>Note: to reduce app’s size, choose the Language of ‘Objective-C’. No worry, only a few code is needed.</p><p><img src="https://farm6.staticflickr.com/5541/31412010806_3e0b0d8720_o.jpg" alt=""></p><h2 id="Settings-for-Helper-Target"><a href="#Settings-for-Helper-Target" class="headerlink" title="Settings for Helper Target"></a>Settings for Helper Target</h2><p>Let the helper works in the background and doesn’t display a Dock icon.<br>Open the <strong>Info</strong> tab for the helper target.</p><ul><li>Under the ‘Custom OS X Application Target Properties’ section, add a new row with the Key ‘<strong>Application is background only</strong>’ and the Boolean value of ‘<strong>YES</strong>’.</li></ul><p><img src="https://farm6.staticflickr.com/5464/31412010896_49ea699cdb_o.jpg" alt=""></p><p>Next, let the helper target skips the install when the base application also gets installed. To do this:<br>Open the <strong>Build Settings</strong> tab for the helper target.</p><ul><li>Search for ‘<strong>Skip Install</strong>’, setting this option to ‘<strong>YES</strong>’</li></ul><p><img src="https://farm6.staticflickr.com/5608/31332952541_d9fd0d8d04_o.jpg" alt=""></p><h2 id="Settings-for-Main-Target"><a href="#Settings-for-Main-Target" class="headerlink" title="Settings for Main Target"></a>Settings for Main Target</h2><p>Open the <strong>Build Settings</strong> tab for the main target.</p><ul><li>Search for the item called ‘<strong>Strip Debug Symbols During Copy</strong>’, and set this item to ‘<strong>NO</strong>’.</li></ul><p><img src="https://farm6.staticflickr.com/5338/31448859785_4939efab2f_o.jpg" alt=""></p><p>Open the <strong>Build Phases</strong> tab for the main target</p><ul><li>If you don’t already have a ‘Copy Files’ phase, then add one by selecting the small + sign in the top left corner of this section.</li><li>Expand the ‘Copy Files’ phase, and select ‘<strong>Wrapper</strong>’ from the Destination drop-down menu</li><li>In the Subpath section, type the following path: “<strong>Contents/Library/LoginItems</strong>“</li><li>Select the + button for the Name section, then search for and add the ‘X Helper.app’ application bundle from the source list that appears, and select it in the list. Click ‘Add’ when done.</li></ul><p><img src="https://farm6.staticflickr.com/5763/31078319720_0523f09e3b_o.jpg" alt=""></p><p>This will ensure that the Helper target is copied into our application bundle when we compile the project.</p><h2 id="Code-for-Helper-Target"><a href="#Code-for-Helper-Target" class="headerlink" title="Code for Helper Target"></a>Code for Helper Target</h2><p>First, remove the menu and base window in the Helper app’s XIB file.</p><p>Open <code>AppDelegate.m</code>, add these code in <code>applicationDidFinishLaunching</code>. It will find out the path for the main application, launch it, and then terminate itself.<br></p><figure class="highlight objectivec"><table><tr><td class="gutter"><pre><div class="line">1</div><div class="line">2</div><div class="line">3</div><div class="line">4</div><div class="line">5</div><div class="line">6</div><div class="line">7</div></pre></td><td class="code"><pre><div class="line">- (<span class="keyword">void</span>)applicationDidFinishLaunching:(<span class="built_in">NSNotification</span> *)aNotification &#123;</div><div class="line">  <span class="built_in">NSArray</span> *pathComponents = [[[<span class="built_in">NSBundle</span> mainBundle] bundlePath] pathComponents];</div><div class="line">  pathComponents = [pathComponents subarrayWithRange:<span class="built_in">NSMakeRange</span>(<span class="number">0</span>, [pathComponents count] - <span class="number">4</span>)];</div><div class="line">  <span class="built_in">NSString</span> *path = [<span class="built_in">NSString</span> pathWithComponents:pathComponents];</div><div class="line">  [[<span class="built_in">NSWorkspace</span> sharedWorkspace] launchApplication:path];</div><div class="line">  [<span class="built_in">NSApp</span> terminate:<span class="literal">nil</span>];</div><div class="line">&#125;</div></pre></td></tr></table></figure><p></p><h2 id="Code-for-Main-Target"><a href="#Code-for-Main-Target" class="headerlink" title="Code for Main Target"></a>Code for Main Target</h2><p>There’re mainly 2 parts.</p><h3 id="Add-Preferences"><a href="#Add-Preferences" class="headerlink" title="Add Preferences"></a>Add Preferences</h3><p>This is mainly to remember user’s choice to auto launch or not. For details, refer to my another <a href="https://github.com/atjason/CocoaDemoWithSwift/tree/master/Preferences" target="_blank" rel="external">project for Preferences</a>.</p><h3 id="Set-Auto-Launch"><a href="#Set-Auto-Launch" class="headerlink" title="Set Auto Launch"></a>Set Auto Launch</h3><p>This step is in fact easy. The core is function of <code>SMLoginItemSetEnabled</code>. Remember to <code>import ServiceManagement</code>.</p><figure class="highlight swift"><table><tr><td class="gutter"><pre><div class="line">1</div><div class="line">2</div><div class="line">3</div><div class="line">4</div><div class="line">5</div><div class="line">6</div><div class="line">7</div><div class="line">8</div><div class="line">9</div><div class="line">10</div><div class="line">11</div><div class="line">12</div><div class="line">13</div><div class="line">14</div><div class="line">15</div><div class="line">16</div><div class="line">17</div><div class="line">18</div><div class="line">19</div></pre></td><td class="code"><pre><div class="line"><span class="keyword">import</span> Cocoa</div><div class="line"><span class="keyword">import</span> ServiceManagement</div><div class="line"></div><div class="line"><span class="class"><span class="keyword">class</span> <span class="title">MainWindowController</span>: <span class="title">NSWindowController</span> </span>&#123;   </div><div class="line">  <span class="meta">@IBAction</span> <span class="function"><span class="keyword">func</span> <span class="title">set</span><span class="params">(sender: NSButton)</span></span> &#123;    </div><div class="line">    <span class="keyword">let</span> appBundleIdentifier = <span class="string">"com.atjason.swift.cocoa.AutoLaunchHelper"</span></div><div class="line">    <span class="keyword">let</span> autoLaunch = (autoLaunchCheckbox.state == <span class="type">NSOnState</span>)</div><div class="line">    <span class="keyword">if</span> <span class="type">SMLoginItemSetEnabled</span>(appBundleIdentifier, autoLaunch) &#123;</div><div class="line">      <span class="keyword">if</span> autoLaunch &#123;</div><div class="line">        <span class="type">NSLog</span>(<span class="string">"Successfully add login item."</span>)</div><div class="line">      &#125; <span class="keyword">else</span> &#123;</div><div class="line">        <span class="type">NSLog</span>(<span class="string">"Successfully remove login item."</span>)</div><div class="line">      &#125;</div><div class="line">      </div><div class="line">    &#125; <span class="keyword">else</span> &#123;</div><div class="line">      <span class="type">NSLog</span>(<span class="string">"Failed to add login item."</span>)</div><div class="line">    &#125;</div><div class="line">  &#125;</div><div class="line">&#125;</div></pre></td></tr></table></figure><h1 id="Test-Auto-Launch"><a href="#Test-Auto-Launch" class="headerlink" title="Test Auto Launch"></a>Test Auto Launch</h1><p>In theory, your app and helper should meet these requirements:</p><ul><li>Move the app in the /Applications folder.</li><li>Both the main and Helper application are signed.</li><li>Both the main and Helper application are sandboxed.</li></ul><p>But in fact, when my test app meet none of the requirements above, it still can auto lauch after reboot. Not sure why, but if you plan to release your app in Mac App Store, obviously these requirements will be met.</p><p>Good luck.</p>]]></content>
    
    <summary type="html">
    
      &lt;p&gt;This article is based on this &lt;a href=&quot;http://martiancraft.com/blog/2015/01/login-items/&quot;&gt;blog&lt;/a&gt;. I adjust and implement using Swift. The project could be downloaded &lt;a href=&quot;https://github.com/atjason/CocoaDemoWithSwift/tree/master/AutoLaunch&quot;&gt;here&lt;/a&gt;.&lt;/p&gt;&lt;p&gt;Development environment:&lt;/p&gt;&lt;ul&gt;&lt;li&gt;OS X: 10.11.4&lt;/li&gt;&lt;li&gt;XCode: 7.3&lt;/li&gt;&lt;li&gt;Swift: 2.2&lt;/li&gt;&lt;/ul&gt;&lt;h1 id=&quot;Enable-‘launch-at-login’-in-Mac-App-Store&quot;&gt;&lt;a href=&quot;#Enable-‘launch-at-login’-in-Mac-App-Store&quot; class=&quot;headerlink&quot; title=&quot;Enable ‘launch at login’ in Mac App Store&quot;&gt;&lt;/a&gt;Enable ‘launch at login’ in Mac App Store&lt;/h1&gt;&lt;p&gt;Beside works in sandbox mode, to enable ‘launch at login’ in Mac App Store, should mee this requirement:&lt;/p&gt;&lt;blockquote&gt;&lt;p&gt;2.26 Apps that are set to auto-launch or to have other code automatically run at startup or login without user consent will be rejected.&lt;/p&gt;&lt;/blockquote&gt;&lt;p&gt;How to deal with it?&lt;br&gt;Easy, just add a checkbox in Preferences to let user choose auto launch or not. And, make sure, do &lt;strong&gt;NOT&lt;/strong&gt; enable it by default. Otherwise Apple will reject it (I was ever rejected for this reason).&lt;/p&gt;&lt;p&gt;&lt;img src=&quot;https://farm6.staticflickr.com/5486/31303440372_cb535ac1c7_o.jpg&quot; alt=&quot;&quot;&gt;&lt;/p&gt;
    
    </summary>
    
      <category term="Cocoa" scheme="https://en.atjason.com/categories/Cocoa/"/>
    
    
  </entry>
  
  <entry>
    <title>Preferences Window</title>
    <link href="https://en.atjason.com/Cocoa/Preferences%20Window.html"/>
    <id>https://en.atjason.com/Cocoa/Preferences Window.html</id>
    <published>2016-04-13T07:42:00.000Z</published>
    <updated>2016-12-06T01:51:54.000Z</updated>
    
    <content type="html"><![CDATA[<p>This article introduces how to build preferences window on Mac OS X using Cocoa with Swift. The source code can be downloaded <a href="https://github.com/atjason/CocoaDemoWithSwift/tree/master/==~~~~==Preferences" target="_blank" rel="external">here</a>.</p><p>Development environment:</p><ul><li>OS X: 10.11.4</li><li>XCode: 7.3</li><li>Swift: 2.2</li></ul><p>After it’s finished, the app looks like:</p><p><img src="https://farm6.staticflickr.com/5596/31078304850_80e40b69d4_o.jpg" alt=""></p><h1 id="NSTabViewController"><a href="#NSTabViewController" class="headerlink" title="NSTabViewController"></a>NSTabViewController</h1><p>The mainly used class is <a href="https://developer.apple.com/library/mac/documentation/AppKit/Reference/NSTabViewController_Class/" target="_blank" rel="external"><code>NSTabViewController</code></a>.<br>An <code>NSTabViewController</code> object is a container view controller that manages a tab view interface, which organizes multiple pages of content but displays only one of those pages at a time. Each page of content is managed by a separate child view controller. Navigation between child view controllers is accomplished with the help of an NSTabView object, which the tab view controller manages. When the user selects a new tab, the tab view controller displays the content associated with the associated child view controller, replacing the previous content.</p><a id="more"></a><h1 id="Storyboard"><a href="#Storyboard" class="headerlink" title="Storyboard"></a>Storyboard</h1><p>Storyboard isn’t necessary to build preferences window, but it could let the workflow be clear and simple.</p><p><img src="https://farm6.staticflickr.com/5712/31332931121_7f86a40076_o.jpg" alt=""></p><h1 id="Preference-Manager"><a href="#Preference-Manager" class="headerlink" title="Preference Manager"></a>Preference Manager</h1><p>Typically there’re many settings in preferences. To make it easy to manage all of them, it’s better to use one singleton class to access them, e.g., register factory defaults, read, write, reset, etc.</p><figure class="highlight swift"><table><tr><td class="gutter"><pre><div class="line">1</div><div class="line">2</div><div class="line">3</div><div class="line">4</div><div class="line">5</div><div class="line">6</div><div class="line">7</div><div class="line">8</div><div class="line">9</div><div class="line">10</div><div class="line">11</div><div class="line">12</div><div class="line">13</div><div class="line">14</div><div class="line">15</div><div class="line">16</div><div class="line">17</div><div class="line">18</div><div class="line">19</div><div class="line">20</div><div class="line">21</div><div class="line">22</div><div class="line">23</div><div class="line">24</div><div class="line">25</div><div class="line">26</div><div class="line">27</div><div class="line">28</div><div class="line">29</div><div class="line">30</div><div class="line">31</div><div class="line">32</div><div class="line">33</div><div class="line">34</div><div class="line">35</div><div class="line">36</div><div class="line">37</div><div class="line">38</div><div class="line">39</div></pre></td><td class="code"><pre><div class="line"><span class="class"><span class="keyword">class</span> <span class="title">PreferenceManager</span> </span>&#123;</div><div class="line">  <span class="comment">// Single instance</span></div><div class="line">  <span class="keyword">static</span> <span class="keyword">let</span> sharedInstance = <span class="type">PreferenceManager</span>()</div><div class="line">    </div><div class="line">  <span class="keyword">private</span> <span class="keyword">init</span>() &#123;</div><div class="line">    registerFactoryDefaults()</div><div class="line">  &#125;</div><div class="line">  </div><div class="line">  <span class="keyword">let</span> userDefaults = <span class="type">NSUserDefaults</span>.standardUserDefaults()</div><div class="line">  </div><div class="line">  <span class="keyword">private</span> <span class="keyword">let</span> initializedKey = <span class="string">"Initialized"</span></div><div class="line">  </div><div class="line">  <span class="keyword">var</span> startAtLogin: <span class="type">Bool</span> &#123;</div><div class="line">    <span class="keyword">get</span> &#123;</div><div class="line">      <span class="keyword">return</span> userDefaults.boolForKey(startAtLoginKey)</div><div class="line">    &#125;</div><div class="line">    </div><div class="line">    <span class="keyword">set</span> &#123;</div><div class="line">      userDefaults.setBool(newValue, forKey: startAtLoginKey)</div><div class="line">    &#125;</div><div class="line">  &#125;</div><div class="line"> </div><div class="line">  <span class="keyword">private</span> <span class="function"><span class="keyword">func</span> <span class="title">registerFactoryDefaults</span><span class="params">()</span></span> &#123;</div><div class="line">    <span class="keyword">let</span> factoryDefaults = [</div><div class="line">      initializedKey: <span class="type">NSNumber</span>(bool: <span class="literal">false</span>),</div><div class="line">    ]</div><div class="line">    </div><div class="line">    userDefaults.registerDefaults(factoryDefaults)</div><div class="line">  &#125;</div><div class="line">  </div><div class="line">  <span class="function"><span class="keyword">func</span> <span class="title">synchronize</span><span class="params">()</span></span> &#123;</div><div class="line">    userDefaults.synchronize()</div><div class="line">  &#125;</div><div class="line">  </div><div class="line">  <span class="function"><span class="keyword">func</span> <span class="title">reset</span><span class="params">()</span></span> &#123;</div><div class="line">    userDefaults.removeObjectForKey(initializedKey)    </div><div class="line">    synchronize()</div><div class="line">  &#125;</div><div class="line">&#125;</div></pre></td></tr></table></figure><h1 id="Bind-with-User-Defaults"><a href="#Bind-with-User-Defaults" class="headerlink" title="Bind with User Defaults"></a>Bind with User Defaults</h1><p>Beside using <code>class PreferenceManager</code>, you can also directly bind object’s value to user defaults.</p><p><img src="https://farm6.staticflickr.com/5753/31448848435_2e6726f29d_o.jpg" alt=""></p><h1 id="Register-Factory-Defaults"><a href="#Register-Factory-Defaults" class="headerlink" title="Register Factory Defaults"></a>Register Factory Defaults</h1><p>It’s better each setting has default value. <code>NSUserDefaults.registerDefaults</code> works for it.<br><strong>Note</strong>: The contents of the registration domain are not written to disk; you need to call this method each time your application starts. You can place a plist file in the application’s Resources directory and call registerDefaults: with the contents that you read in from that file.</p><h1 id="Archive"><a href="#Archive" class="headerlink" title="Archive"></a>Archive</h1><p>To store data in user defaults, the object need to support archvie. For key based archive, the class need to conform to <code>NSCoding</code>. For more introduction, please refer to <a href="https://github.com/atjason/LearnCocoaWithSwift/tree/master/12_Archiving/RaiseMan" target="_blank" rel="external">here</a>.</p><h1 id="Store-Tab-View’s-Size"><a href="#Store-Tab-View’s-Size" class="headerlink" title="Store Tab View’s Size"></a>Store Tab View’s Size</h1><p>If you allow user to resize the size of each tab view, its better to store them in user defaults, and restore when user access preferences window again. But as the structure of <code>NSSize</code> doesn’t support archive, you need to use a class to archive it.</p><figure class="highlight swift"><table><tr><td class="gutter"><pre><div class="line">1</div><div class="line">2</div><div class="line">3</div><div class="line">4</div><div class="line">5</div><div class="line">6</div><div class="line">7</div><div class="line">8</div><div class="line">9</div><div class="line">10</div><div class="line">11</div><div class="line">12</div><div class="line">13</div><div class="line">14</div><div class="line">15</div><div class="line">16</div><div class="line">17</div><div class="line">18</div><div class="line">19</div><div class="line">20</div><div class="line">21</div><div class="line">22</div><div class="line">23</div><div class="line">24</div><div class="line">25</div><div class="line">26</div><div class="line">27</div><div class="line">28</div><div class="line">29</div><div class="line">30</div><div class="line">31</div><div class="line">32</div><div class="line">33</div><div class="line">34</div><div class="line">35</div><div class="line">36</div></pre></td><td class="code"><pre><div class="line"></div><div class="line"><span class="class"><span class="keyword">class</span> <span class="title">SizeArchiver</span>: <span class="title">NSObject</span>, <span class="title">NSCoding</span> </span>&#123;</div><div class="line">  <span class="keyword">private</span> <span class="keyword">static</span> <span class="keyword">let</span> sizeKey = <span class="string">"Size"</span></div><div class="line">  </div><div class="line">  <span class="keyword">var</span> size = <span class="type">NSSize</span>()</div><div class="line">  </div><div class="line">  <span class="keyword">var</span> width: <span class="type">CGFloat</span> &#123;</div><div class="line">    <span class="keyword">return</span> size.width</div><div class="line">  &#125;</div><div class="line">  </div><div class="line">  <span class="keyword">var</span> height: <span class="type">CGFloat</span> &#123;</div><div class="line">    <span class="keyword">return</span> size.height</div><div class="line">  &#125;</div><div class="line">  </div><div class="line">  <span class="keyword">override</span> <span class="keyword">init</span>() &#123;</div><div class="line">    <span class="keyword">super</span>.<span class="keyword">init</span>()</div><div class="line">  &#125;</div><div class="line">  </div><div class="line">  <span class="keyword">init</span>(size: <span class="type">NSSize</span>) &#123;</div><div class="line">    <span class="keyword">super</span>.<span class="keyword">init</span>()</div><div class="line">    </div><div class="line">    <span class="keyword">self</span>.size = size</div><div class="line">  &#125;</div><div class="line">  </div><div class="line">  <span class="comment">// MARK: - NSCoding</span></div><div class="line">  </div><div class="line">  <span class="keyword">required</span> <span class="keyword">init</span>?(coder aDecoder: <span class="type">NSCoder</span>) &#123;</div><div class="line">    <span class="keyword">super</span>.<span class="keyword">init</span>()</div><div class="line">    </div><div class="line">    <span class="keyword">self</span>.size = aDecoder.decodeSizeForKey(<span class="type">SizeArchiver</span>.sizeKey)</div><div class="line">  &#125;</div><div class="line">  </div><div class="line">  <span class="function"><span class="keyword">func</span> <span class="title">encodeWithCoder</span><span class="params">(aCoder: NSCoder)</span></span> &#123;</div><div class="line">    aCoder.encodeSize(<span class="keyword">self</span>.size, forKey: <span class="type">SizeArchiver</span>.sizeKey)</div><div class="line">  &#125;</div><div class="line">&#125;</div></pre></td></tr></table></figure>]]></content>
    
    <summary type="html">
    
      &lt;p&gt;This article introduces how to build preferences window on Mac OS X using Cocoa with Swift. The source code can be downloaded &lt;a href=&quot;https://github.com/atjason/CocoaDemoWithSwift/tree/master/==~~~~==Preferences&quot;&gt;here&lt;/a&gt;.&lt;/p&gt;&lt;p&gt;Development environment:&lt;/p&gt;&lt;ul&gt;&lt;li&gt;OS X: 10.11.4&lt;/li&gt;&lt;li&gt;XCode: 7.3&lt;/li&gt;&lt;li&gt;Swift: 2.2&lt;/li&gt;&lt;/ul&gt;&lt;p&gt;After it’s finished, the app looks like:&lt;/p&gt;&lt;p&gt;&lt;img src=&quot;https://farm6.staticflickr.com/5596/31078304850_80e40b69d4_o.jpg&quot; alt=&quot;&quot;&gt;&lt;/p&gt;&lt;h1 id=&quot;NSTabViewController&quot;&gt;&lt;a href=&quot;#NSTabViewController&quot; class=&quot;headerlink&quot; title=&quot;NSTabViewController&quot;&gt;&lt;/a&gt;NSTabViewController&lt;/h1&gt;&lt;p&gt;The mainly used class is &lt;a href=&quot;https://developer.apple.com/library/mac/documentation/AppKit/Reference/NSTabViewController_Class/&quot;&gt;&lt;code&gt;NSTabViewController&lt;/code&gt;&lt;/a&gt;.&lt;br&gt;An &lt;code&gt;NSTabViewController&lt;/code&gt; object is a container view controller that manages a tab view interface, which organizes multiple pages of content but displays only one of those pages at a time. Each page of content is managed by a separate child view controller. Navigation between child view controllers is accomplished with the help of an NSTabView object, which the tab view controller manages. When the user selects a new tab, the tab view controller displays the content associated with the associated child view controller, replacing the previous content.&lt;/p&gt;
    
    </summary>
    
      <category term="Cocoa" scheme="https://en.atjason.com/categories/Cocoa/"/>
    
    
  </entry>
  
  <entry>
    <title>Storyboard</title>
    <link href="https://en.atjason.com/Cocoa/Storyboard.html"/>
    <id>https://en.atjason.com/Cocoa/Storyboard.html</id>
    <published>2016-04-13T01:50:00.000Z</published>
    <updated>2016-12-06T01:51:54.000Z</updated>
    
    <content type="html"><![CDATA[<p>This article introduces how to build status bar app on Mac OS X using Cocoa with Swift. The source code can be downloaded <a href="https://github.com/atjason/LearnCocoaWithSwift/tree/master/32_Storyboards/MirrorChatter" target="_blank" rel="external">here</a>.</p><p>Development environment:</p><ul><li>OS X: 10.11.4</li><li>XCode: 7.3</li><li>Swift: 2.2</li></ul><p>After it’s finished, the app looks like:</p><p><img src="https://farm6.staticflickr.com/5661/31412007576_17bd6cd9cb_o.jpg" alt=""></p><h1 id="Storyboard-introduction"><a href="#Storyboard-introduction" class="headerlink" title="Storyboard introduction"></a>Storyboard introduction</h1><p>With storyboards, you can combine as much (or as little) of your application as you want in one canvas, as well as visualize how the parts relate to each other.<br>Storyboards are organized by scenes (windows and views), which are connected to each other by segues. Segues describe the scenes’ relationships to one another. Storyboards can be used to describe a window and its popover or sheet – or a complicated graph of nested views, each with its own view controller, which previously would have necessitated programmatic construction.<br>Storyboards were added to OS X in 10.10 Yosemite and to iOS in version 5.</p><p>To create the relationship segue between the window controller and the split view controller, control-drag from the blue Window Controller icon in the border on top of the window controller down to the split view controller. In the pop-up Relationship Segue window that appears, select window content.</p><p><img src="https://farm6.staticflickr.com/5745/31332942411_d83d67bfea_o.jpg" alt=""></p><a id="more"></a><h1 id="How-is-the-Storyboard-Loaded"><a href="#How-is-the-Storyboard-Loaded" class="headerlink" title="How is the Storyboard Loaded?"></a>How is the Storyboard Loaded?</h1><p>Just like with MainMenu.xib, the answer is in the Info.plist.<br>If you check the Info.plist for this project you will see that the key NSMainStoryboardFile is set to Main.</p><p><img src="https://farm6.staticflickr.com/5660/31332943681_ffa325b84a_o.jpg" alt=""></p><p>Scenes can also be loaded from storyboards programmatically. The NSStoryboard class provides this, much like NSBundle does for NIB loading. Within a storyboard, one scene can be designated as the <strong>initial controller</strong>. This is used in the application’s Main.storyboard to designate the application window to be opened at launch.</p><p><img src="https://farm6.staticflickr.com/5619/31448857885_8a82dc269f_o.jpg" alt=""></p><p>Controllers within a storyboard can also be instantiated by their identifier, which is set in the identity inspector. If you had a view controller with an identifier of Palette, you could instantiate the view controller and show it in a window using the following code:<br></p><figure class="highlight swift"><table><tr><td class="gutter"><pre><div class="line">1</div><div class="line">2</div><div class="line">3</div><div class="line">4</div><div class="line">5</div><div class="line">6</div><div class="line">7</div></pre></td><td class="code"><pre><div class="line"><span class="keyword">if</span> <span class="keyword">let</span> storyboard = <span class="type">NSStoryboard</span>(name: <span class="string">"Main"</span>, bundle: <span class="literal">nil</span>) &#123;</div><div class="line">    <span class="keyword">if</span> <span class="keyword">let</span> vc = storyboard.instantiateControllerWithIdentifier(<span class="string">"Palette"</span>)</div><div class="line">            <span class="keyword">as</span>? <span class="type">NSViewController</span> &#123;</div><div class="line">        paletteWindow = <span class="type">NSWindow</span>(contentViewController: vc)</div><div class="line">        paletteWindow.makeKeyAndOrderFront(<span class="literal">nil</span>)</div><div class="line">    &#125;</div><div class="line">&#125;</div></pre></td></tr></table></figure><p></p>]]></content>
    
    <summary type="html">
    
      &lt;p&gt;This article introduces how to build status bar app on Mac OS X using Cocoa with Swift. The source code can be downloaded &lt;a href=&quot;https://github.com/atjason/LearnCocoaWithSwift/tree/master/32_Storyboards/MirrorChatter&quot;&gt;here&lt;/a&gt;.&lt;/p&gt;&lt;p&gt;Development environment:&lt;/p&gt;&lt;ul&gt;&lt;li&gt;OS X: 10.11.4&lt;/li&gt;&lt;li&gt;XCode: 7.3&lt;/li&gt;&lt;li&gt;Swift: 2.2&lt;/li&gt;&lt;/ul&gt;&lt;p&gt;After it’s finished, the app looks like:&lt;/p&gt;&lt;p&gt;&lt;img src=&quot;https://farm6.staticflickr.com/5661/31412007576_17bd6cd9cb_o.jpg&quot; alt=&quot;&quot;&gt;&lt;/p&gt;&lt;h1 id=&quot;Storyboard-introduction&quot;&gt;&lt;a href=&quot;#Storyboard-introduction&quot; class=&quot;headerlink&quot; title=&quot;Storyboard introduction&quot;&gt;&lt;/a&gt;Storyboard introduction&lt;/h1&gt;&lt;p&gt;With storyboards, you can combine as much (or as little) of your application as you want in one canvas, as well as visualize how the parts relate to each other.&lt;br&gt;Storyboards are organized by scenes (windows and views), which are connected to each other by segues. Segues describe the scenes’ relationships to one another. Storyboards can be used to describe a window and its popover or sheet – or a complicated graph of nested views, each with its own view controller, which previously would have necessitated programmatic construction.&lt;br&gt;Storyboards were added to OS X in 10.10 Yosemite and to iOS in version 5.&lt;/p&gt;&lt;p&gt;To create the relationship segue between the window controller and the split view controller, control-drag from the blue Window Controller icon in the border on top of the window controller down to the split view controller. In the pop-up Relationship Segue window that appears, select window content.&lt;/p&gt;&lt;p&gt;&lt;img src=&quot;https://farm6.staticflickr.com/5745/31332942411_d83d67bfea_o.jpg&quot; alt=&quot;&quot;&gt;&lt;/p&gt;
    
    </summary>
    
      <category term="Cocoa" scheme="https://en.atjason.com/categories/Cocoa/"/>
    
    
  </entry>
  
  <entry>
    <title>Status Bar App</title>
    <link href="https://en.atjason.com/Cocoa/Status%20Bar%20App.html"/>
    <id>https://en.atjason.com/Cocoa/Status Bar App.html</id>
    <published>2016-04-08T04:56:00.000Z</published>
    <updated>2016-12-06T01:51:54.000Z</updated>
    
    <content type="html"><![CDATA[<p>This article introduces how to build status bar app on Mac OS X using Cocoa with Swift. The source code can be downloaded <a href="https://github.com/atjason/CocoaDemoWithSwift/tree/master/StatusBarApp/StatusBarApp" target="_blank" rel="external">here</a>.</p><p>Development environment:</p><ul><li>OS X: 10.11.4</li><li>XCode: 7.3</li><li>Swift: 2.2</li></ul><p>After it’s finished, the app looks like:</p><p><img src="https://farm6.staticflickr.com/5488/30640931343_83d18f8a5a_o.jpg" alt=""></p><h1 id="How-to-Run-as-Status-Bar-App"><a href="#How-to-Run-as-Status-Bar-App" class="headerlink" title="How to Run as Status Bar App?"></a>How to Run as Status Bar App?</h1><p>In another word, how to make the application not show a dock icon? The key point is to modify the application’s Info.plist file and indicate that it’s an agent. “Agent” is Apple’s term for a background application that doesn’t present a dock icon.<br>Select the project at the top of the project navigator. Open the Info tab at the top of the main editor. Add a new entry of <strong>Application is agent (UIElement)</strong> and set the value of this entry to YES.</p><p><img src="https://farm6.staticflickr.com/5675/31411993296_9b15e794b0_o.jpg" alt=""></p><a id="more"></a><h1 id="How-to-Let-Status-App-Start"><a href="#How-to-Let-Status-App-Start" class="headerlink" title="How to Let Status App Start?"></a>How to Let Status App Start?</h1><p>It’s better don’t write much code in AppDelegate or other single class. To do it, I split main code in these 2 controllers:</p><ol><li><p>StatusItemController<br>This controller is mainly to ‘start’ the app, i.e., init the status bar item. And also set the menu for status bar item.</p></li><li><p>StatusMenuController<br>This controller mainly works as the delegate of status bar item’s menu. E.g., implement the actions of menu items.</p></li></ol><p>Then, how to let the app start? Steps:</p><ul><li>Open ‘MainMenu.xib’.</li><li>Create Menu and sub-menus.</li></ul><p><img src="https://farm6.staticflickr.com/5800/31078308250_73c43c03e0_o.jpg" alt=""></p><ul><li>Add an Object. Set its class to ‘StatusMenuController’.</li></ul><p><img src="https://farm6.staticflickr.com/5520/31078308940_84a366791b_o.jpg" alt=""></p><p><img src="https://farm6.staticflickr.com/5509/31411998896_3027536681_o.jpg" alt=""></p><ul><li>Add another Object of ‘StatusItemController’.</li><li>Connect Menu object to StatusMenuController’s ‘menu’ outlet.</li></ul><p><img src="https://farm6.staticflickr.com/5346/31448852885_edf4a2bd81_o.jpg" alt=""></p><ul><li>Connect StatusMenuController to StatusItemController’s ‘menuController’ outlet.</li></ul><p><img src="https://farm6.staticflickr.com/5685/31303433362_8b4cf99dd8_o.jpg" alt=""></p><ul><li>Open StatusItemController.swift, init the status bar item in ‘awakeFromNib’.<figure class="highlight swift"><table><tr><td class="gutter"><pre><div class="line">1</div><div class="line">2</div><div class="line">3</div><div class="line">4</div><div class="line">5</div><div class="line">6</div><div class="line">7</div><div class="line">8</div><div class="line">9</div><div class="line">10</div><div class="line">11</div></pre></td><td class="code"><pre><div class="line"><span class="class"><span class="keyword">class</span> <span class="title">StatusItemController</span>: <span class="title">NSObject</span> </span>&#123;</div><div class="line">  <span class="keyword">var</span> statusItem: <span class="type">NSStatusItem</span>!</div><div class="line">  <span class="meta">@IBOutlet</span> <span class="keyword">weak</span> <span class="keyword">var</span> menuController: <span class="type">StatusMenuController</span>!  </div><div class="line">  <span class="keyword">override</span> <span class="function"><span class="keyword">func</span> <span class="title">awakeFromNib</span><span class="params">()</span></span> &#123;</div><div class="line">    statusItem = <span class="type">NSStatusBar</span>.systemStatusBar()</div><div class="line">      .statusItemWithLength(<span class="type">NSVariableStatusItemLength</span>)</div><div class="line">    statusItem.title = <span class="string">"App"</span></div><div class="line">    statusItem.highlightMode = <span class="literal">true</span></div><div class="line">    statusItem.menu = menuController.menu</div><div class="line">  &#125;</div><div class="line">&#125;</div></pre></td></tr></table></figure></li></ul><p>That’s it. Now the app should be able to correctly start. As you can see, the key point is, app will init the ‘MainMenu.xib’ (as defined in Info.plist &gt; ‘Main nib file base name’), then all the objects in ‘MainMenu.xib” will be created. So, the menu and controllers you added in ‘MainMenu.xib” will be created. Clear?</p><p>In this case, the AppDelegate could even keep empty. Cool, right?<br></p><figure class="highlight swift"><table><tr><td class="gutter"><pre><div class="line">1</div><div class="line">2</div></pre></td><td class="code"><pre><div class="line"><span class="meta">@NSApplicationMain</span></div><div class="line"><span class="class"><span class="keyword">class</span> <span class="title">AppDelegate</span>: <span class="title">NSObject</span>, <span class="title">NSApplicationDelegate</span> </span>&#123;&#125;</div></pre></td></tr></table></figure><p></p><h1 id="How-to-Show-Percent-in-Status-Bar"><a href="#How-to-Show-Percent-in-Status-Bar" class="headerlink" title="How to Show Percent in Status Bar?"></a>How to Show Percent in Status Bar?</h1><p>There’s class of <code>NSProgressIndicator</code>. The fact of it is a view. Thus the problem becomes how to add this view to status bar.</p><p>You will find, the <code>NSStatusItem.view</code> is <code>nil</code>, thus you can’t add to its subview. From the API of <code>NSStatusItem</code> we can found, it’s suggested to use <code>NSStatusItem.button</code> to customize. OK, we can add view to subviews of the <code>button</code>.<br></p><figure class="highlight swift"><table><tr><td class="gutter"><pre><div class="line">1</div><div class="line">2</div><div class="line">3</div></pre></td><td class="code"><pre><div class="line"><span class="comment">/// The button that is displayed in the status bar. This is created automatically on the creation of the StatusItem. Behavior customization for the button, such as image, target/action, tooltip, can be set with this property.</span></div><div class="line"><span class="meta">@available</span>(<span class="type">OSX</span> <span class="number">10.10</span>, *)</div><div class="line"><span class="keyword">public</span> <span class="keyword">var</span> button: <span class="type">NSStatusBarButton</span>? &#123; <span class="keyword">get</span> &#125;</div></pre></td></tr></table></figure><p></p><p>That’s not finished. Using this code could show the percent in status bar, but the size of status bar item is incorrect. How to deal with it? To be honest, I didn’t find a good way, but find a walkaround way, i.e., add an <strong>empty</strong> image to the status bar item. And then add <code>NSProgressIndicator</code> to the <code>button</code>. It’s not good, but works. The code is as following:<br></p><figure class="highlight swift"><table><tr><td class="gutter"><pre><div class="line">1</div><div class="line">2</div><div class="line">3</div><div class="line">4</div><div class="line">5</div><div class="line">6</div><div class="line">7</div><div class="line">8</div><div class="line">9</div><div class="line">10</div><div class="line">11</div><div class="line">12</div><div class="line">13</div><div class="line">14</div><div class="line">15</div><div class="line">16</div><div class="line">17</div><div class="line">18</div><div class="line">19</div><div class="line">20</div><div class="line">21</div><div class="line">22</div><div class="line">23</div><div class="line">24</div></pre></td><td class="code"><pre><div class="line">  <span class="keyword">if</span> <span class="keyword">let</span> button = statusItem.button &#123;</div><div class="line">        <span class="comment">// <span class="doctag">FIXME:</span> it works, but obviously not good.</span></div><div class="line">        <span class="keyword">let</span> frame = <span class="type">NSRect</span>(x: <span class="number">6</span>, y: <span class="number">2</span>, width: <span class="number">18</span>, height: <span class="number">18</span>)</div><div class="line">        <span class="keyword">let</span> progressIndicator = <span class="type">NSProgressIndicator</span>(frame: frame)</div><div class="line">        progressIndicator.style = .<span class="type">SpinningStyle</span></div><div class="line">        progressIndicator.indeterminate = <span class="literal">false</span></div><div class="line">        progressIndicator.doubleValue = <span class="number">30</span></div><div class="line">        </div><div class="line">        <span class="comment">// Use empty image to extand the status item's size</span></div><div class="line">        statusItem.image = <span class="type">NSImage</span>(named: <span class="string">"EmptyIconImage"</span>)</div><div class="line">        button.addSubview(progressIndicator)</div><div class="line">  &#125;</div><div class="line">``` </div><div class="line"><span class="type">And</span> the percent looks like:</div><div class="line"></div><div class="line">![](https:<span class="comment">//farm6.staticflickr.com/5492/31332937901_69060ed428_o.jpg)</span></div><div class="line">![](https:<span class="comment">//farm6.staticflickr.com/5720/31303434582_304507af58_o.jpg)</span></div><div class="line"></div><div class="line"># <span class="type">How</span> to <span class="type">Disable</span> a <span class="type">Menu</span> <span class="type">Item</span>?</div><div class="line"><span class="type">It</span> sounds very easy. <span class="type">Just</span> <span class="keyword">set</span> the `<span class="type">NSMenuItem</span>.enabled = <span class="literal">false</span>`. <span class="type">But</span> the fact <span class="keyword">is</span> not. <span class="type">Read</span> the description <span class="keyword">for</span> `<span class="type">NSMenuItem</span>.autoenablesItems`:</div><div class="line"></div><div class="line">```swift</div><div class="line">    <span class="comment">/* Set and get whether the menu autoenables items.  If a menu autoenables items, then calls to -[NSMenuItem setEnabled:] are ignored, and the enabled state is computed via the NSMenuValidation informal protocol below.  Autoenabling is on by default. */</span></div><div class="line">    <span class="keyword">public</span> <span class="keyword">var</span> autoenablesItems: <span class="type">Bool</span></div></pre></td></tr></table></figure><p></p><p>As you can see, <code>NSMenuItem.autoenablesItems</code> is enabled by default. And if it’s enabled, the set of <code>NSMenuItem.enabled</code> property will be ignored. Thus, if you want to manually control the <code>NSMenuItem.enabled</code> property, first disable the <code>NSMenuItem.autoenablesItems</code> property.</p><h1 id="How-to-Support-Dark-Mode"><a href="#How-to-Support-Dark-Mode" class="headerlink" title="How to Support Dark Mode?"></a>How to Support Dark Mode?</h1><p>There’re 2 key points needed to support dark mode of OS X.</p><ol><li>The icon itself should support. To be exactly, the background of the icon should be transparent.</li><li>Set the <code>NSMenuItem.image?.template = true</code></li></ol><figure class="highlight swift"><table><tr><td class="gutter"><pre><div class="line">1</div><div class="line">2</div><div class="line">3</div><div class="line">4</div><div class="line">5</div><div class="line">6</div></pre></td><td class="code"><pre><div class="line"><span class="comment">/* The 'template' property is metadata that allows clients to be smarter about image processing.  An image should be marked as a template if it is basic glpyh-like black and white art that is intended to be processed into derived images for use on screen.</span></div><div class="line"> </div><div class="line"> NSButtonCell applies effects to images based on the state of the button.  For example, images are shaded darker when the button is pressed.  If a template image is set on a cell, the cell can apply more sophisticated effects.  For example, it may be processed into an image that looks engraved when drawn into a cell whose interiorBackgroundStyle is NSBackgroundStyleRaised, like on a textured button.</div><div class="line"> */</div><div class="line"></div><div class="line"><span class="keyword">public</span> <span class="keyword">var</span> template: <span class="type">Bool</span></div></pre></td></tr></table></figure><p>The normal and dark status bar items look like:</p><p><img src="https://farm6.staticflickr.com/5523/30640938093_f9355d69ca_o.jpg" alt=""><br><img src="https://farm6.staticflickr.com/5349/31303436232_0f985fed3d_o.jpg" alt=""></p><h1 id="How-to-Support-Indentation-Level"><a href="#How-to-Support-Indentation-Level" class="headerlink" title="How to Support Indentation Level?"></a>How to Support Indentation Level?</h1><p>Easy. Just set the <code>NSMenuItem.indentationLevel</code>.</p><p><img src="https://farm6.staticflickr.com/5718/31078312640_0c66c7e47b_o.jpg" alt=""></p><h1 id="How-to-Pop-Over"><a href="#How-to-Pop-Over" class="headerlink" title="How to Pop Over?"></a>How to Pop Over?</h1><p>It’s easy to pop over status item. Check the following code:<br></p><figure class="highlight swift"><table><tr><td class="gutter"><pre><div class="line">1</div><div class="line">2</div><div class="line">3</div></pre></td><td class="code"><pre><div class="line"><span class="keyword">if</span> <span class="keyword">let</span> button = statusItem.button &#123;</div><div class="line">  popover.showRelativeToRect(button.bounds, ofView: button, preferredEdge: .<span class="type">MinY</span>)</div><div class="line">&#125;</div></pre></td></tr></table></figure><p></p><p>But it’s hard to pop over menu item, as menu item’s view is nil by default. And then no view or bound to show popover relatively. Ever see some other app like <a href="http://www.clipmenu.com/blog/2014/11/11/clipmenu-1-0-0a1-released/" target="_blank" rel="external">ClipMenu</a> could implement this feature, but hasn’t found how to do it.</p><p>Another walkaround is to use <code>NSMenuItem.toolTip</code> to show additional information of a menu item.</p><h1 id="What-Left"><a href="#What-Left" class="headerlink" title="What Left?"></a>What Left?</h1><ul><li>tag and representedObject</li><li>action</li></ul>]]></content>
    
    <summary type="html">
    
      &lt;p&gt;This article introduces how to build status bar app on Mac OS X using Cocoa with Swift. The source code can be downloaded &lt;a href=&quot;https://github.com/atjason/CocoaDemoWithSwift/tree/master/StatusBarApp/StatusBarApp&quot;&gt;here&lt;/a&gt;.&lt;/p&gt;&lt;p&gt;Development environment:&lt;/p&gt;&lt;ul&gt;&lt;li&gt;OS X: 10.11.4&lt;/li&gt;&lt;li&gt;XCode: 7.3&lt;/li&gt;&lt;li&gt;Swift: 2.2&lt;/li&gt;&lt;/ul&gt;&lt;p&gt;After it’s finished, the app looks like:&lt;/p&gt;&lt;p&gt;&lt;img src=&quot;https://farm6.staticflickr.com/5488/30640931343_83d18f8a5a_o.jpg&quot; alt=&quot;&quot;&gt;&lt;/p&gt;&lt;h1 id=&quot;How-to-Run-as-Status-Bar-App&quot;&gt;&lt;a href=&quot;#How-to-Run-as-Status-Bar-App&quot; class=&quot;headerlink&quot; title=&quot;How to Run as Status Bar App?&quot;&gt;&lt;/a&gt;How to Run as Status Bar App?&lt;/h1&gt;&lt;p&gt;In another word, how to make the application not show a dock icon? The key point is to modify the application’s Info.plist file and indicate that it’s an agent. “Agent” is Apple’s term for a background application that doesn’t present a dock icon.&lt;br&gt;Select the project at the top of the project navigator. Open the Info tab at the top of the main editor. Add a new entry of &lt;strong&gt;Application is agent (UIElement)&lt;/strong&gt; and set the value of this entry to YES.&lt;/p&gt;&lt;p&gt;&lt;img src=&quot;https://farm6.staticflickr.com/5675/31411993296_9b15e794b0_o.jpg&quot; alt=&quot;&quot;&gt;&lt;/p&gt;
    
    </summary>
    
      <category term="Cocoa" scheme="https://en.atjason.com/categories/Cocoa/"/>
    
    
  </entry>
  
  <entry>
    <title>Use NSOutlineView With NSTreeController</title>
    <link href="https://en.atjason.com/Cocoa/Outline%20With%20Controller.html"/>
    <id>https://en.atjason.com/Cocoa/Outline With Controller.html</id>
    <published>2016-04-06T12:38:00.000Z</published>
    <updated>2016-12-08T13:53:32.000Z</updated>
    
    <content type="html"><![CDATA[<p>This article describes the steps to use NSOutlineView With NSTreeController. The source code can be downloaded <a href="https://github.com/atjason/CocoaDemoWithSwift/tree/master/Outline/OutlineWithController" target="_blank" rel="external">here</a>.</p><p>Development environment:</p><ul><li>OS X: 10.11.4</li><li>XCode: 7.3</li><li>Swift: 2.2</li></ul><h1 id="Steps"><a href="#Steps" class="headerlink" title="Steps"></a>Steps</h1><h2 id="Create-Basic-Project"><a href="#Create-Basic-Project" class="headerlink" title="Create Basic Project"></a>Create Basic Project</h2><p>Refer to commit till <a href="https://github.com/atjason/CocoaDemoWithSwift/commit/40ccec2db2584251483fe4dc0b9cc02746aebde3" target="_blank" rel="external">#40ccec2</a>.</p><h2 id="Add-UI-Controls"><a href="#Add-UI-Controls" class="headerlink" title="Add UI Controls"></a>Add UI Controls</h2><p>Refer to commit till <a href="https://github.com/atjason/CocoaDemoWithSwift/commit/2853186db767c0790c1ef3b99de53338818e39c6" target="_blank" rel="external">#2853186</a>.<br>After done, the UI looks like:</p><p><img src="https://farm6.staticflickr.com/5663/31303406692_2e04a5bdec_o.jpg" alt=""></p><a id="more"></a><h2 id="Add-Model-Class-of-“Node”"><a href="#Add-Model-Class-of-“Node”" class="headerlink" title="Add Model Class of “Node”"></a>Add Model Class of “Node”</h2><p>Refer to commit till <a href="https://github.com/atjason/CocoaDemoWithSwift/commit/516acc4b6363a7d28862473ff464c33ef0b17a48" target="_blank" rel="external">#516acc4</a>.<br></p><figure class="highlight swift"><table><tr><td class="gutter"><pre><div class="line">1</div><div class="line">2</div><div class="line">3</div><div class="line">4</div><div class="line">5</div><div class="line">6</div><div class="line">7</div><div class="line">8</div><div class="line">9</div><div class="line">10</div><div class="line">11</div><div class="line">12</div></pre></td><td class="code"><pre><div class="line"><span class="class"><span class="keyword">class</span> <span class="title">Node</span>: <span class="title">NSObject</span> </span>&#123;</div><div class="line">  <span class="keyword">var</span> title = <span class="string">"Node"</span></div><div class="line">  <span class="keyword">var</span> children = [<span class="type">Node</span>]()</div><div class="line">  </div><div class="line">  <span class="keyword">override</span> <span class="keyword">init</span>() &#123;</div><div class="line">    <span class="keyword">super</span>.<span class="keyword">init</span>()</div><div class="line">  &#125;</div><div class="line"></div><div class="line">  <span class="keyword">init</span>(title: <span class="type">String</span>) &#123;</div><div class="line">    <span class="keyword">self</span>.title = title</div><div class="line">  &#125;</div><div class="line">&#125;</div></pre></td></tr></table></figure><p></p><h2 id="Prepare-Demo-Nodes-Data"><a href="#Prepare-Demo-Nodes-Data" class="headerlink" title="Prepare Demo Nodes Data"></a>Prepare Demo Nodes Data</h2><p>Refer to commit till <a href="https://github.com/atjason/CocoaDemoWithSwift/commit/f9148114ec25db9a10e654f776396d1b2a2952a0" target="_blank" rel="external">#f914811</a>.<br>Node structure:<br>- Node<br>- Group<br>-– Node A<br>-– Node B</p><h2 id="Add-and-Configure-NSTreeController"><a href="#Add-and-Configure-NSTreeController" class="headerlink" title="Add and Configure NSTreeController"></a>Add and Configure NSTreeController</h2><p>Refer to commit till <a href="https://github.com/atjason/CocoaDemoWithSwift/commit/06b01a8ffcbe39dc07403ea74f89b8a8ef420015" target="_blank" rel="external">#06b01a8</a>.<br>Steps</p><ul><li>Add NSTreeController in the .xib and select it.</li><li>Go to “Attricutes Inspector”.<ul><li>Set the “Key Paths &gt; Children” to “children”.</li><li>Choose “Mode” Class and set “Class Name” to “OutlineWithController.Node”.</li><li>Select “Prepares Content”</li></ul></li></ul><p><img src="https://farm6.staticflickr.com/5708/31411961566_5e43982c53_o.jpg" alt=""></p><ul><li>Go to “Binding Inspector”.<ul><li>Bind “Content Array” to self.nodes (which was created in previous step, and it should be <strong>dynamic</strong>).</li></ul></li></ul><p><img src="https://farm6.staticflickr.com/5490/31332915111_4232dc553e_o.jpg" alt=""></p><h2 id="Bind-NSOutlineView"><a href="#Bind-NSOutlineView" class="headerlink" title="Bind NSOutlineView"></a>Bind NSOutlineView</h2><p>Refer to commit till <a href="https://github.com/atjason/CocoaDemoWithSwift/commit/f941f7be8e87ec8d99e67aaae4e059892b56e897" target="_blank" rel="external">#f941f7b</a>.<br>Steps</p><ul><li>Select “Outline View”.</li><li>Go to “Binding Inspector”.<ul><li>Bind “Content” to “Tree Controller”‘s “arrangedObjects”. Ignore the warning in “Model Key Path”.</li><li>Bind “Selection Index Paths” to Tree Controller’s “selectionIndexPaths”.</li></ul></li></ul><p><img src="https://farm6.staticflickr.com/5796/31303410492_050d9a6a17_o.jpg" alt=""></p><ul><li>Select “Table View Cell”.</li><li>Go to “Binding Inspector”.<ul><li>Bind “Content” to “Tree Cell View”‘s “objectValue.title”. Node: here the “objectValue” is the class Node as you defined it in the tree controller.</li></ul></li></ul><p><img src="https://farm6.staticflickr.com/5454/31303411522_280527545a_o.jpg" alt=""></p><ul><li>Go to “Attributes Inspector”.<ul><li>Set “Behavior” to “Editable”.</li></ul></li></ul><p><img src="https://farm6.staticflickr.com/5558/31078296720_261ddc7e6b_o.jpg" alt=""></p><p>Run the app, you should see the app like:</p><p><img src="https://farm6.staticflickr.com/5784/31332917871_a544120ac0_o.jpg" alt=""></p><h2 id="Add-Node-and-Remove-It"><a href="#Add-Node-and-Remove-It" class="headerlink" title="Add Node and Remove It"></a>Add Node and Remove It</h2><p>Refer to commit till <a href="https://github.com/atjason/CocoaDemoWithSwift/commit/d9b71976817eb248db1c19e404e8db16e96187a2" target="_blank" rel="external">#d9b7197</a>.<br>Steps</p><ul><li>Right click on the tree controller.</li><li>Connect “add:” to “Add Node” menu item.</li><li>Connect “addChild:” to “Add Child Node” menu item.</li><li>Connect “remove:” to edit button.</li></ul><p><img src="https://farm6.staticflickr.com/5653/31303414282_9473713262_o.jpg" alt=""></p><p>That’s it. Run the app. You should be able to add node or remove it.</p><h2 id="Edit-Selected-Node"><a href="#Edit-Selected-Node" class="headerlink" title="Edit Selected Node"></a>Edit Selected Node</h2><p>Refer to commit till <a href="https://github.com/atjason/CocoaDemoWithSwift/commit/22e2c073297d8887b13c97d9030ae5dee30e12c6" target="_blank" rel="external">#22e2c07</a>.<br>The key code is here:<br></p><figure class="highlight swift"><table><tr><td class="gutter"><pre><div class="line">1</div><div class="line">2</div><div class="line">3</div><div class="line">4</div><div class="line">5</div><div class="line">6</div></pre></td><td class="code"><pre><div class="line"><span class="meta">@IBAction</span> <span class="function"><span class="keyword">func</span> <span class="title">editNode</span><span class="params">(sender: NSObject)</span></span> &#123;</div><div class="line">  <span class="keyword">let</span> row = outlineView.selectedRow</div><div class="line">  <span class="keyword">if</span> row != -<span class="number">1</span> &#123;</div><div class="line">    outlineView.editColumn(<span class="number">0</span>, row: row, withEvent: <span class="literal">nil</span>, select: <span class="literal">true</span>)</div><div class="line">  &#125;</div><div class="line">&#125;</div></pre></td></tr></table></figure><p></p><h2 id="Disable-Remove-and-Edit-Controls-if-no-Node-Selected"><a href="#Disable-Remove-and-Edit-Controls-if-no-Node-Selected" class="headerlink" title="Disable Remove and Edit Controls if no Node Selected"></a>Disable Remove and Edit Controls if no Node Selected</h2><p>Refer to commit till <a href="https://github.com/atjason/CocoaDemoWithSwift/commit/eb7decdf6a2baeb60f6883e287899ab61d825af8" target="_blank" rel="external">#eb7decd</a>.<br>The key point is to bind the “Enabled” attribute to tree controller’s “canRemove” controller key.<br>Another point is, when app starts maybe nothing was selected. In this case, disable the Outline’s “Attributes &gt; Selection &gt; Empty”, and select the Tree Controller’s “Attributes &gt; Avoid Empty Selection”.</p>]]></content>
    
    <summary type="html">
    
      &lt;p&gt;This article describes the steps to use NSOutlineView With NSTreeController. The source code can be downloaded &lt;a href=&quot;https://github.com/atjason/CocoaDemoWithSwift/tree/master/Outline/OutlineWithController&quot;&gt;here&lt;/a&gt;.&lt;/p&gt;&lt;p&gt;Development environment:&lt;/p&gt;&lt;ul&gt;&lt;li&gt;OS X: 10.11.4&lt;/li&gt;&lt;li&gt;XCode: 7.3&lt;/li&gt;&lt;li&gt;Swift: 2.2&lt;/li&gt;&lt;/ul&gt;&lt;h1 id=&quot;Steps&quot;&gt;&lt;a href=&quot;#Steps&quot; class=&quot;headerlink&quot; title=&quot;Steps&quot;&gt;&lt;/a&gt;Steps&lt;/h1&gt;&lt;h2 id=&quot;Create-Basic-Project&quot;&gt;&lt;a href=&quot;#Create-Basic-Project&quot; class=&quot;headerlink&quot; title=&quot;Create Basic Project&quot;&gt;&lt;/a&gt;Create Basic Project&lt;/h2&gt;&lt;p&gt;Refer to commit till &lt;a href=&quot;https://github.com/atjason/CocoaDemoWithSwift/commit/40ccec2db2584251483fe4dc0b9cc02746aebde3&quot;&gt;#40ccec2&lt;/a&gt;.&lt;/p&gt;&lt;h2 id=&quot;Add-UI-Controls&quot;&gt;&lt;a href=&quot;#Add-UI-Controls&quot; class=&quot;headerlink&quot; title=&quot;Add UI Controls&quot;&gt;&lt;/a&gt;Add UI Controls&lt;/h2&gt;&lt;p&gt;Refer to commit till &lt;a href=&quot;https://github.com/atjason/CocoaDemoWithSwift/commit/2853186db767c0790c1ef3b99de53338818e39c6&quot;&gt;#2853186&lt;/a&gt;.&lt;br&gt;After done, the UI looks like:&lt;/p&gt;&lt;p&gt;&lt;img src=&quot;https://farm6.staticflickr.com/5663/31303406692_2e04a5bdec_o.jpg&quot; alt=&quot;&quot;&gt;&lt;/p&gt;
    
    </summary>
    
      <category term="Cocoa" scheme="https://en.atjason.com/categories/Cocoa/"/>
    
    
  </entry>
  
  <entry>
    <title>Use NSOutlineView With DataSource and Delegate</title>
    <link href="https://en.atjason.com/Cocoa/Outline.html"/>
    <id>https://en.atjason.com/Cocoa/Outline.html</id>
    <published>2016-04-06T05:11:00.000Z</published>
    <updated>2016-12-08T13:53:51.000Z</updated>
    
    <content type="html"><![CDATA[<p>This article describes the steps to use NSOutlineView With NSOutlineViewDataSource and NSOutlineViewDelegate. The source code can be downloaded <a href="https://github.com/atjason/CocoaDemoWithSwift/tree/master/Outline/Outline" target="_blank" rel="external">here</a>.</p><p>Development environment:</p><ul><li>OS X: 10.11.4</li><li>XCode: 7.3</li><li>Swift: 2.2</li></ul><h1 id="Steps"><a href="#Steps" class="headerlink" title="Steps"></a>Steps</h1><h2 id="Create-Basic-Project"><a href="#Create-Basic-Project" class="headerlink" title="Create Basic Project"></a>Create Basic Project</h2><p>Refer to commit till <a href="https://github.com/atjason/CocoaDemoWithSwift/commit/fa626ee5f880da924a1c7fd7b8b988015020f2e6" target="_blank" rel="external">#fa626ee</a>.</p><h2 id="Add-Model-Class-of-“Node”"><a href="#Add-Model-Class-of-“Node”" class="headerlink" title="Add Model Class of “Node”"></a>Add Model Class of “Node”</h2><p>Refer to commit till <a href="https://github.com/atjason/CocoaDemoWithSwift/commit/e302b91f3d4268714323fd3d94c21a781ed135fb" target="_blank" rel="external">#e302b91</a>.<br></p><figure class="highlight swift"><table><tr><td class="gutter"><pre><div class="line">1</div><div class="line">2</div><div class="line">3</div><div class="line">4</div><div class="line">5</div><div class="line">6</div><div class="line">7</div><div class="line">8</div><div class="line">9</div><div class="line">10</div><div class="line">11</div><div class="line">12</div><div class="line">13</div><div class="line">14</div><div class="line">15</div><div class="line">16</div><div class="line">17</div><div class="line">18</div></pre></td><td class="code"><pre><div class="line"><span class="class"><span class="keyword">class</span> <span class="title">Node</span>: <span class="title">NSObject</span> </span>&#123;</div><div class="line">  <span class="keyword">var</span> title = <span class="string">"Node"</span></div><div class="line">  <span class="keyword">var</span> isGroup = <span class="literal">false</span></div><div class="line">  <span class="keyword">var</span> children = [<span class="type">Node</span>]()</div><div class="line">  <span class="keyword">weak</span> <span class="keyword">var</span> parent: <span class="type">Node</span>?</div><div class="line">  </div><div class="line">  <span class="keyword">override</span> <span class="keyword">init</span>() &#123;</div><div class="line">    <span class="keyword">super</span>.<span class="keyword">init</span>()</div><div class="line">  &#125;</div><div class="line">  </div><div class="line">  <span class="keyword">init</span>(title: <span class="type">String</span>) &#123;</div><div class="line">    <span class="keyword">self</span>.title = title</div><div class="line">  &#125;</div><div class="line">  </div><div class="line">  <span class="function"><span class="keyword">func</span> <span class="title">isLeaf</span><span class="params">()</span></span> -&gt; <span class="type">Bool</span> &#123;</div><div class="line">    <span class="keyword">return</span> children.isEmpty</div><div class="line">  &#125;</div><div class="line">&#125;</div></pre></td></tr></table></figure><p></p><a id="more"></a><h2 id="Add-UI-Controls"><a href="#Add-UI-Controls" class="headerlink" title="Add UI Controls"></a>Add UI Controls</h2><p>Refer to commit till <a href="https://github.com/atjason/CocoaDemoWithSwift/commit/5dee8d160650624d55333808b7fa5e9fba6e0b9c" target="_blank" rel="external">#5dee8d1</a>.<br>After done, the UI looks like:</p><p><img src="https://farm6.staticflickr.com/5513/31078297700_fc0e048454_o.jpg" alt=""></p><h2 id="Implement-NSOutlineViewDataSource"><a href="#Implement-NSOutlineViewDataSource" class="headerlink" title="Implement NSOutlineViewDataSource"></a>Implement NSOutlineViewDataSource</h2><p>Refer to commit till <a href="https://github.com/atjason/CocoaDemoWithSwift/commit/c467d0b36a58994dca5f376d668777d8484a72fd" target="_blank" rel="external">#c467d0b</a>.<br>Notes:</p><ul><li><p>Set NSOutlineView’s dataSource to File’s Owner.<br><img src="https://farm6.staticflickr.com/5445/31303416292_3dbbb9c077_o.jpg" alt=""></p></li><li><p>Bind value “Table Cell View” to “Table Cell View” &gt; Model Key Path: objectValue.title.<br><img src="https://farm6.staticflickr.com/5661/31303418352_2f985f6a86_o.jpg" alt=""></p></li></ul><p>After done, the UI looks like:</p><p><img src="https://farm6.staticflickr.com/5703/31078299580_c874b3fb94_o.jpg" alt=""></p><h2 id="Implement-NSOutlineViewDelegate"><a href="#Implement-NSOutlineViewDelegate" class="headerlink" title="Implement NSOutlineViewDelegate"></a>Implement NSOutlineViewDelegate</h2><p>Refer to commit till <a href="https://github.com/atjason/CocoaDemoWithSwift/commit/300948eaabd9afe72c1addcb0438102bc21c2783" target="_blank" rel="external">#300948e</a>.</p><p>Notes:</p><ul><li>Set NSOutlineView’s delegate to File’s Owner.<br><img src="https://farm6.staticflickr.com/5698/30640920653_2b1750cee8_o.jpg" alt=""></li></ul><h2 id="Add-Node-and-Group"><a href="#Add-Node-and-Group" class="headerlink" title="Add Node and Group"></a>Add Node and Group</h2><p>Refer to commit till <a href="https://github.com/atjason/CocoaDemoWithSwift/commit/f18c61f94bd813f0ae2c0d2d33dbc6054f530d61" target="_blank" rel="external">#f18c61f</a>.</p><p>Notes:</p><ul><li>The logic to add node or group in correct position is very boring. That’s why binding will be a good friend.</li><li>There’re 2 ways to insert item in outline view. One is update the data modal, then call <code>NSOutlineView.reloadData()</code>. But this will let UI flash. So it’s better to manually insert item in outline view (e.g., use <code>NSOutlineView.insertItemsAtIndexes</code>). Another benefit is could use animation during inserting.</li></ul><p>After done, you can add node or group. The UI looks like:</p><p><img src="https://farm6.staticflickr.com/5344/31303421682_6c97330c0e_o.jpg" alt=""></p><h2 id="Implement-other-UI-Operations"><a href="#Implement-other-UI-Operations" class="headerlink" title="Implement other UI Operations"></a>Implement other UI Operations</h2><p>The operations include remove, edit, move up and move down. It’s not hard. But the logic is complex and boring. Be careful.<br>Refer to commit till <a href="https://github.com/atjason/CocoaDemoWithSwift/commit/3f7ffaa8efb62b5e08d2f53da693da05055a80cf" target="_blank" rel="external">#3f7ffaa</a>.</p><p>Notes</p><ul><li><p>Could create a <strong>dynamic</strong> property (e.g., <code>dynamic var removeButtonEnabled = false</code>), and then bind a control’s enable property to it. e.g.,<br><img src="https://farm6.staticflickr.com/5593/30640925323_2d063c143d_o.jpg" alt=""></p></li><li><p>Should set table view cell’s behavior as “Editable” to edit it.<br><img src="https://farm6.staticflickr.com/5529/30640927443_912e4b7e77_o.jpg" alt=""></p></li></ul>]]></content>
    
    <summary type="html">
    
      &lt;p&gt;This article describes the steps to use NSOutlineView With NSOutlineViewDataSource and NSOutlineViewDelegate. The source code can be downloaded &lt;a href=&quot;https://github.com/atjason/CocoaDemoWithSwift/tree/master/Outline/Outline&quot;&gt;here&lt;/a&gt;.&lt;/p&gt;&lt;p&gt;Development environment:&lt;/p&gt;&lt;ul&gt;&lt;li&gt;OS X: 10.11.4&lt;/li&gt;&lt;li&gt;XCode: 7.3&lt;/li&gt;&lt;li&gt;Swift: 2.2&lt;/li&gt;&lt;/ul&gt;&lt;h1 id=&quot;Steps&quot;&gt;&lt;a href=&quot;#Steps&quot; class=&quot;headerlink&quot; title=&quot;Steps&quot;&gt;&lt;/a&gt;Steps&lt;/h1&gt;&lt;h2 id=&quot;Create-Basic-Project&quot;&gt;&lt;a href=&quot;#Create-Basic-Project&quot; class=&quot;headerlink&quot; title=&quot;Create Basic Project&quot;&gt;&lt;/a&gt;Create Basic Project&lt;/h2&gt;&lt;p&gt;Refer to commit till &lt;a href=&quot;https://github.com/atjason/CocoaDemoWithSwift/commit/fa626ee5f880da924a1c7fd7b8b988015020f2e6&quot;&gt;#fa626ee&lt;/a&gt;.&lt;/p&gt;&lt;h2 id=&quot;Add-Model-Class-of-“Node”&quot;&gt;&lt;a href=&quot;#Add-Model-Class-of-“Node”&quot; class=&quot;headerlink&quot; title=&quot;Add Model Class of “Node”&quot;&gt;&lt;/a&gt;Add Model Class of “Node”&lt;/h2&gt;&lt;p&gt;Refer to commit till &lt;a href=&quot;https://github.com/atjason/CocoaDemoWithSwift/commit/e302b91f3d4268714323fd3d94c21a781ed135fb&quot;&gt;#e302b91&lt;/a&gt;.&lt;br&gt;&lt;/p&gt;&lt;figure class=&quot;highlight swift&quot;&gt;&lt;table&gt;&lt;tr&gt;&lt;td class=&quot;gutter&quot;&gt;&lt;pre&gt;&lt;div class=&quot;line&quot;&gt;1&lt;/div&gt;&lt;div class=&quot;line&quot;&gt;2&lt;/div&gt;&lt;div class=&quot;line&quot;&gt;3&lt;/div&gt;&lt;div class=&quot;line&quot;&gt;4&lt;/div&gt;&lt;div class=&quot;line&quot;&gt;5&lt;/div&gt;&lt;div class=&quot;line&quot;&gt;6&lt;/div&gt;&lt;div class=&quot;line&quot;&gt;7&lt;/div&gt;&lt;div class=&quot;line&quot;&gt;8&lt;/div&gt;&lt;div class=&quot;line&quot;&gt;9&lt;/div&gt;&lt;div class=&quot;line&quot;&gt;10&lt;/div&gt;&lt;div class=&quot;line&quot;&gt;11&lt;/div&gt;&lt;div class=&quot;line&quot;&gt;12&lt;/div&gt;&lt;div class=&quot;line&quot;&gt;13&lt;/div&gt;&lt;div class=&quot;line&quot;&gt;14&lt;/div&gt;&lt;div class=&quot;line&quot;&gt;15&lt;/div&gt;&lt;div class=&quot;line&quot;&gt;16&lt;/div&gt;&lt;div class=&quot;line&quot;&gt;17&lt;/div&gt;&lt;div class=&quot;line&quot;&gt;18&lt;/div&gt;&lt;/pre&gt;&lt;/td&gt;&lt;td class=&quot;code&quot;&gt;&lt;pre&gt;&lt;div class=&quot;line&quot;&gt;&lt;span class=&quot;class&quot;&gt;&lt;span class=&quot;keyword&quot;&gt;class&lt;/span&gt; &lt;span class=&quot;title&quot;&gt;Node&lt;/span&gt;: &lt;span class=&quot;title&quot;&gt;NSObject&lt;/span&gt; &lt;/span&gt;&amp;#123;&lt;/div&gt;&lt;div class=&quot;line&quot;&gt;  &lt;span class=&quot;keyword&quot;&gt;var&lt;/span&gt; title = &lt;span class=&quot;string&quot;&gt;&quot;Node&quot;&lt;/span&gt;&lt;/div&gt;&lt;div class=&quot;line&quot;&gt;  &lt;span class=&quot;keyword&quot;&gt;var&lt;/span&gt; isGroup = &lt;span class=&quot;literal&quot;&gt;false&lt;/span&gt;&lt;/div&gt;&lt;div class=&quot;line&quot;&gt;  &lt;span class=&quot;keyword&quot;&gt;var&lt;/span&gt; children = [&lt;span class=&quot;type&quot;&gt;Node&lt;/span&gt;]()&lt;/div&gt;&lt;div class=&quot;line&quot;&gt;  &lt;span class=&quot;keyword&quot;&gt;weak&lt;/span&gt; &lt;span class=&quot;keyword&quot;&gt;var&lt;/span&gt; parent: &lt;span class=&quot;type&quot;&gt;Node&lt;/span&gt;?&lt;/div&gt;&lt;div class=&quot;line&quot;&gt;  &lt;/div&gt;&lt;div class=&quot;line&quot;&gt;  &lt;span class=&quot;keyword&quot;&gt;override&lt;/span&gt; &lt;span class=&quot;keyword&quot;&gt;init&lt;/span&gt;() &amp;#123;&lt;/div&gt;&lt;div class=&quot;line&quot;&gt;    &lt;span class=&quot;keyword&quot;&gt;super&lt;/span&gt;.&lt;span class=&quot;keyword&quot;&gt;init&lt;/span&gt;()&lt;/div&gt;&lt;div class=&quot;line&quot;&gt;  &amp;#125;&lt;/div&gt;&lt;div class=&quot;line&quot;&gt;  &lt;/div&gt;&lt;div class=&quot;line&quot;&gt;  &lt;span class=&quot;keyword&quot;&gt;init&lt;/span&gt;(title: &lt;span class=&quot;type&quot;&gt;String&lt;/span&gt;) &amp;#123;&lt;/div&gt;&lt;div class=&quot;line&quot;&gt;    &lt;span class=&quot;keyword&quot;&gt;self&lt;/span&gt;.title = title&lt;/div&gt;&lt;div class=&quot;line&quot;&gt;  &amp;#125;&lt;/div&gt;&lt;div class=&quot;line&quot;&gt;  &lt;/div&gt;&lt;div class=&quot;line&quot;&gt;  &lt;span class=&quot;function&quot;&gt;&lt;span class=&quot;keyword&quot;&gt;func&lt;/span&gt; &lt;span class=&quot;title&quot;&gt;isLeaf&lt;/span&gt;&lt;span class=&quot;params&quot;&gt;()&lt;/span&gt;&lt;/span&gt; -&amp;gt; &lt;span class=&quot;type&quot;&gt;Bool&lt;/span&gt; &amp;#123;&lt;/div&gt;&lt;div class=&quot;line&quot;&gt;    &lt;span class=&quot;keyword&quot;&gt;return&lt;/span&gt; children.isEmpty&lt;/div&gt;&lt;div class=&quot;line&quot;&gt;  &amp;#125;&lt;/div&gt;&lt;div class=&quot;line&quot;&gt;&amp;#125;&lt;/div&gt;&lt;/pre&gt;&lt;/td&gt;&lt;/tr&gt;&lt;/table&gt;&lt;/figure&gt;&lt;p&gt;&lt;/p&gt;
    
    </summary>
    
      <category term="Cocoa" scheme="https://en.atjason.com/categories/Cocoa/"/>
    
    
  </entry>
  
</feed>